Knowing how to check your engine oil level is one of the simplest yet most important steps you can take to keep your car running smoothly. If you don’t keep an eye on your oil, you risk serious engine damage that could cost you a lot of time and money.
But don’t worry—checking your oil is easier than you think, and you don’t need to be a mechanic to do it right. You’ll discover exactly how to check your engine oil level quickly and accurately, so you can protect your car and drive with confidence every time.
Keep reading—you’ll be glad you did.
Why Check Engine Oil
Checking your engine oil is a simple but important step in car care. Engine oil keeps your vehicle running smoothly. It protects the engine and stops it from breaking down. Regular checks help avoid costly repairs and keep your engine healthy.
Role Of Engine Oil
Engine oil lubricates moving parts inside the engine. It reduces friction and prevents parts from wearing out. Oil also cools the engine by carrying heat away. It cleans by carrying dirt and debris to the oil filter. Without enough oil, the engine can overheat and get damaged.
Signs Of Low Oil Level
Low oil can cause strange engine noises like knocking or ticking. The oil warning light on your dashboard may turn on. The engine might run hotter than usual. You may notice smoke from the exhaust. These signs show the oil level is too low and needs checking soon.

Tools Needed
Checking your engine oil level is simple but needs the right tools. Having the correct equipment ensures an accurate reading and helps maintain your car’s health. Below, learn about the essential tools needed for this task.
Choosing The Right Dipstick
The dipstick is the main tool to measure oil level. Most cars have a built-in dipstick with a brightly colored handle. Make sure the dipstick fits your engine type and model. A clean, undamaged dipstick gives the best oil reading. If the dipstick is missing or damaged, get a replacement from an auto parts store or dealer.
Additional Supplies
Besides the dipstick, a clean cloth or paper towel is important. Use it to wipe the dipstick before and after checking the oil. Gloves protect your hands from oil stains. A flashlight helps to see clearly if the engine area is dark. Keep all these supplies ready for a quick and safe oil check.
Preparing Your Vehicle
Preparing your vehicle is the first step to check the engine oil level accurately. It helps get the correct reading and protects your engine parts. Follow these simple steps before checking the oil.
Park On Level Ground
Find a flat and even surface to park your car. This stops the oil from pooling on one side. Parking on a slope gives a wrong oil level reading. Make sure the car is steady before moving to the next step.
Turn Off The Engine
Switch off the engine and let it rest. This stops the oil from circulating inside the engine. Checking oil while the engine runs can cause wrong measurements. Always check oil with the engine off for safety and accuracy.
Let The Engine Cool
Wait at least 10 minutes after turning off the engine. Hot oil flows differently and can give false readings. Cooling lets the oil settle back into the pan. It also prevents burns from hot engine parts or oil.
Step-by-step Oil Check
Checking your engine oil level is a simple but important task. It helps keep your car running smoothly. Follow these easy steps to check your oil correctly. This routine check can prevent engine damage and save money.
Locate The Dipstick
Open the car hood and find the dipstick. It usually has a bright handle, often yellow or orange. The dipstick is near the engine. If unsure, check your car manual.
Remove And Clean The Dipstick
Pull the dipstick out slowly. Use a clean cloth or paper towel to wipe off the oil. Make sure the dipstick is clean before the next step. This helps get an accurate reading.
Reinsert And Remove Dipstick Again
Put the dipstick back fully into its tube. Push it all the way in. Then, pull it out slowly once more. This second removal shows the true oil level.
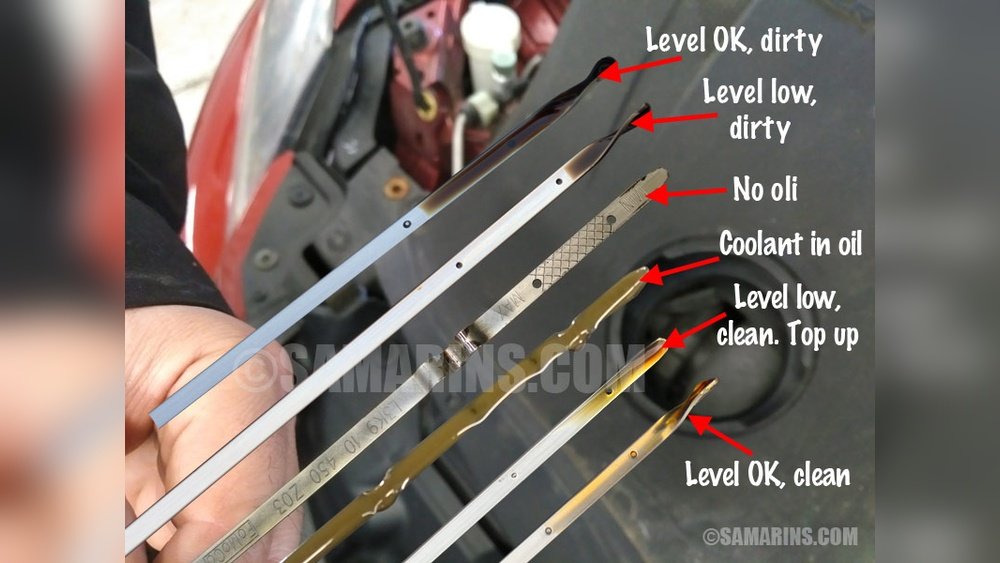
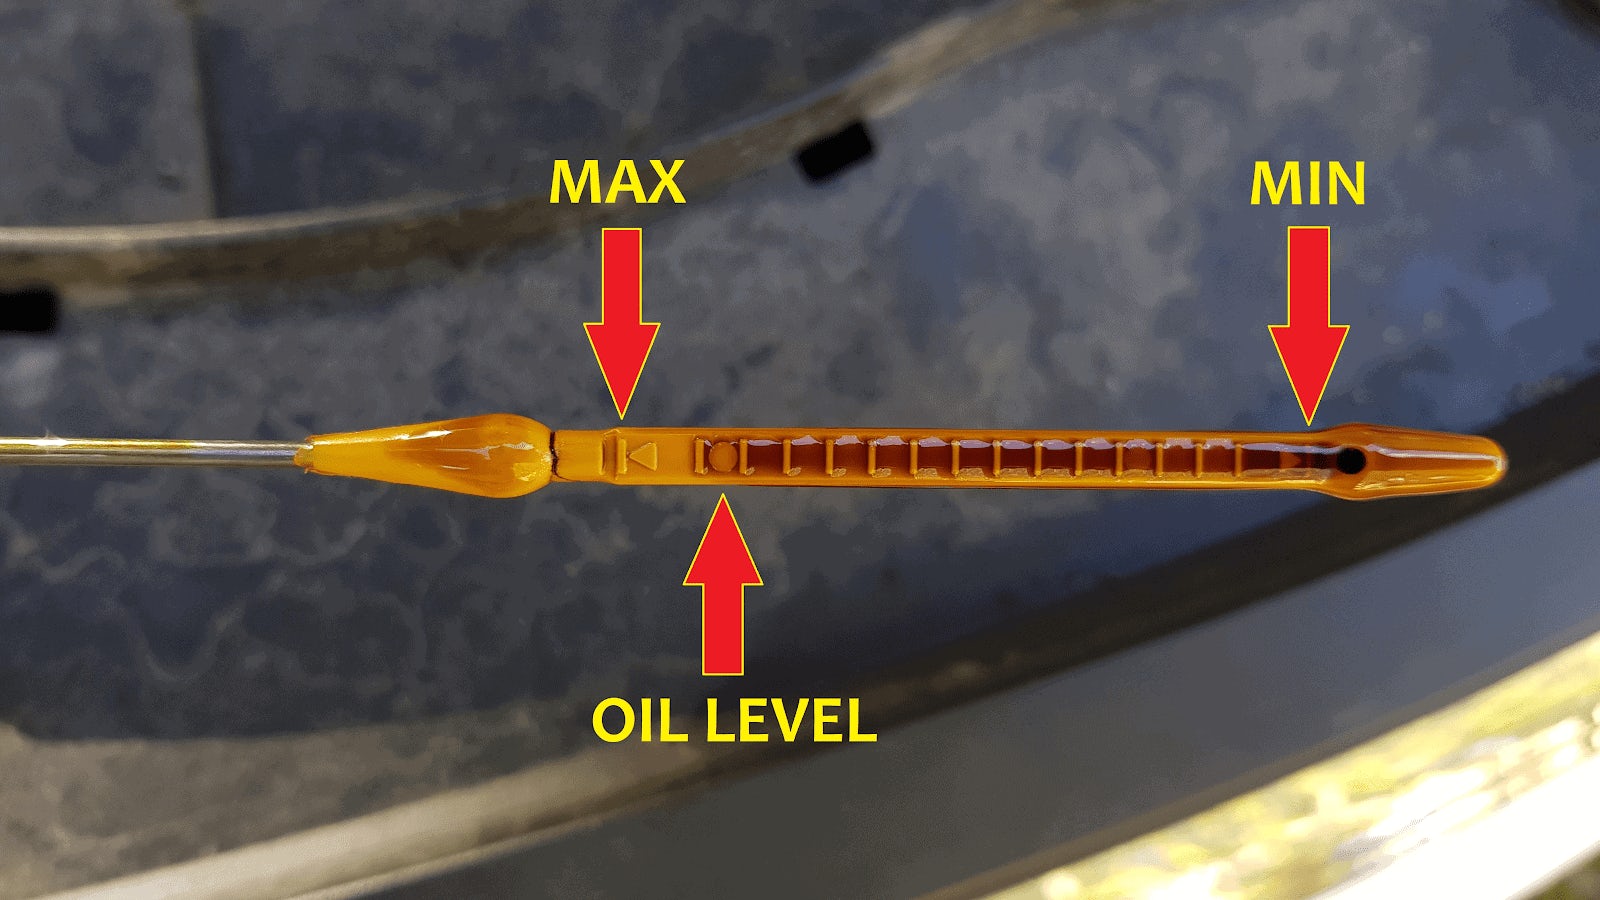
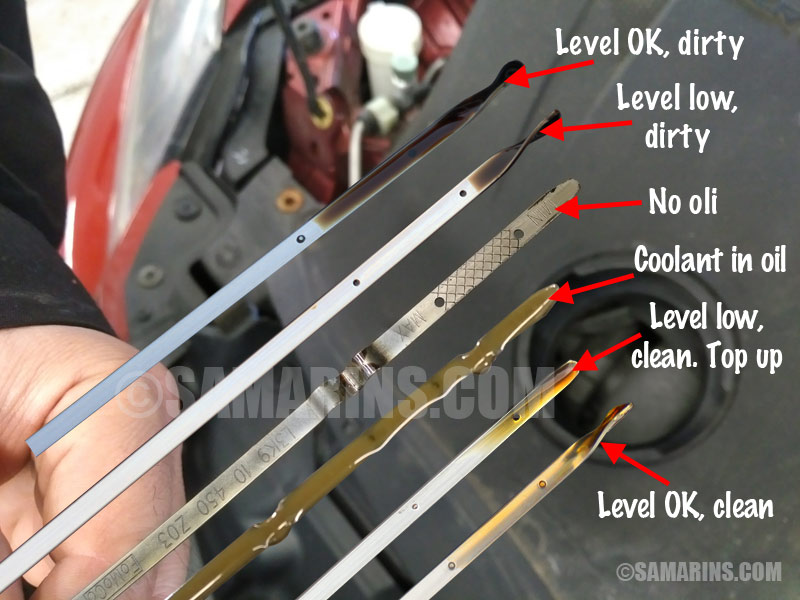
Read The Oil Level
Look at the dipstick’s end to see the oil mark. The oil should be between the low and full marks. If below the low mark, you need to add oil. Do not overfill.
Check Oil Condition
Check the oil color and texture on the dipstick. Fresh oil is amber and clear. Dark, dirty, or gritty oil means it needs changing. Good oil keeps the engine healthy.
Interpreting Oil Levels
Checking your engine oil level is only the first step. Understanding what the reading means is just as important. The oil level tells you how much oil is inside the engine. This amount affects how well your car runs and how long the engine lasts. Knowing the right oil level can help you avoid engine problems and costly repairs.
Oil Level Too Low
Low oil can harm your engine. It means there is not enough oil to lubricate moving parts. This causes friction and heat. Over time, this damages the engine and reduces its life. Low oil might also cause the engine to overheat or make strange noises. Check for leaks or burning oil if the level is too low.
Oil Level Too High
Too much oil can be bad too. Extra oil can cause pressure inside the engine. This may lead to oil leaks or damage seals. High oil levels can also cause the oil to foam. Foamy oil does not lubricate well. This reduces engine protection and can cause damage over time.
Optimal Oil Level
The best oil level sits between the low and high marks on the dipstick. This level ensures proper lubrication and cooling. It keeps engine parts moving smoothly. Check the oil level regularly to maintain this balance. Proper oil levels help your engine run better and last longer.
Adding Engine Oil
Adding engine oil is a simple task but must be done carefully. The right oil keeps your engine running smoothly. Too much or the wrong type can cause damage. This section guides you through choosing the correct oil, adding it safely, and checking the level again.
Choosing The Right Oil
Use the oil type recommended in your car’s manual. Check the oil grade, like 5W-30 or 10W-40. The wrong grade can reduce engine performance. Pick a brand that meets industry standards. Synthetic oils last longer but cost more. Conventional oils are fine for older engines.
How To Add Oil Safely
Make sure the engine is cool before adding oil. Open the hood and locate the oil fill cap. Remove the cap and use a clean funnel to avoid spills. Pour the oil slowly to prevent overfilling. Add small amounts and check the level often. Wipe any spilled oil immediately to avoid smoke or fire risks.
Rechecking After Adding
Wait a few minutes after adding oil for it to settle. Pull out the dipstick and wipe it clean. Insert the dipstick fully and remove it again. Check the oil level against the marks on the stick. The oil should be between the low and full marks. If low, add a little more oil. Never overfill the engine with oil.
Common Mistakes To Avoid
Checking your engine oil level is simple but easy to mess up. Small mistakes can lead to wrong readings and hurt your engine. Avoid these common errors to keep your car running smoothly.
Checking When Engine Is Hot
Do not check oil right after driving. The engine oil gets very hot and can give a false reading. Wait at least 10 minutes for oil to cool and settle. This helps you see the correct oil level. Also, hot oil can burn your hand. Always be careful.
Ignoring Oil Quality
Oil looks dark and dirty over time. Don’t ignore this sign. Dirty oil loses its power to protect the engine. Check the oil’s smell and texture too. If it smells burnt or feels gritty, change it. Clean oil keeps your engine healthy and lasts longer.
Using Incorrect Oil Type
Use the oil type your car’s manual recommends. Wrong oil can cause engine damage or poor performance. Different engines need different oil thickness and types. Using incorrect oil reduces fuel efficiency and may void warranties. Always pick the right oil for your vehicle model.
Maintenance Tips
Maintaining the right engine oil level is key for your car’s health. Proper care helps the engine run smoothly. It also prevents costly repairs. Follow these simple maintenance tips to keep your engine oil in good shape.
Regular Oil Checks
Check your oil level often. Do it at least once a month. Make sure the car is parked on a flat surface. Use the dipstick to measure the oil level. Clean the dipstick before and after checking. This helps get an accurate reading.
Scheduling Oil Changes
Change your oil on time. Follow the schedule in your car’s manual. Old oil loses its ability to protect the engine. Fresh oil keeps the engine parts moving well. It also removes dirt and prevents wear.
Monitoring Oil Leaks
Watch for oil spots under your car. Check the engine area for any wet or greasy spots. Oil leaks can cause low oil levels quickly. Fix leaks as soon as you find them. This keeps your engine safe from damage.
Frequently Asked Questions
How Often Should I Check My Engine Oil Level?
Check your engine oil level at least once a month. Regular checks help prevent engine damage. Always check when the engine is cool and on level ground.
What Tools Do I Need To Check Engine Oil?
You only need a clean rag and your vehicle’s dipstick. The dipstick measures oil level and condition. No special tools are required, making it a simple DIY task.
Can Low Engine Oil Damage My Car?
Yes, low engine oil can cause severe engine damage. Oil lubricates moving parts and prevents overheating. Running low on oil risks costly repairs and engine failure.
When Is The Best Time To Check Oil Level?
The best time is when the engine is cold. Checking right after driving can give inaccurate readings. Also, park on a level surface for accuracy.
Conclusion
Checking your engine oil level keeps your car running smoothly. It helps avoid costly repairs and engine damage. Always check oil when the engine is cool and parked on level ground. Pull out the dipstick, wipe it clean, then reinsert and check the level.
Keep oil between the minimum and maximum marks. Regular checks save time and money. Simple steps, big benefits. Stay safe, and keep your engine healthy by checking oil often.


