If you want to park more safely and avoid those stressful blind spots, installing a reverse camera is a smart move. But how do you connect a reverse camera to your vehicle without getting overwhelmed?
You’re in the right place. This guide will walk you through simple, clear steps that anyone can follow. By the end, you’ll have your camera set up and ready to help you back up with confidence. Keep reading, and let’s make your driving safer together!
Choosing The Right Reverse Camera
Choosing the right reverse camera is important for safe driving and easy parking. A good camera gives a clear view of the area behind your vehicle. It helps to avoid accidents and protects your car from damage. Understanding different camera types and what to consider will help you pick the best one.
Types Of Reverse Cameras
There are several types of reverse cameras. The most common is the wired camera. It connects directly to the car’s display screen. Wireless cameras send video signals without cables. They are easier to install but may face signal issues. Another type is the mirror camera. It replaces or attaches to the rearview mirror. Some cameras have wide-angle lenses for a larger view. Others include night vision for dark conditions.
Factors To Consider
Think about the camera’s resolution. Higher resolution means clearer images. Check the camera’s field of view. A wider view covers more area behind the car. Look at the installation process. Some cameras need professional help, others are DIY-friendly. Weather resistance is important. The camera must work well in rain or snow. Also, consider the price. Choose a camera that fits your budget and needs.
Tools And Materials Needed
Setting up a reverse camera needs specific tools and materials. Having the right items makes installation easier and safer. Preparing ahead saves time and avoids mistakes.
Below are the main tools and materials needed for the job. Each plays an important role in the process.
Reverse Camera Kit
Choose a good quality reverse camera kit. It should include the camera, power cable, and video cable. Some kits come with a monitor or a wireless transmitter.
Power Drill And Drill Bits
A power drill helps make holes for mounting the camera. Use drill bits that match the size of the camera screws. A cordless drill offers better control and ease.
Screwdrivers
Different screws require flathead or Phillips screwdrivers. Have both types ready. Screwdrivers are essential for securing the camera and opening panels.
Wire Strippers And Cutters
Strip and cut wires cleanly for good electrical connections. Wire strippers help remove insulation without damaging wires. Wire cutters trim cables to the right length.
Electrical Tape And Connectors
Electrical tape insulates wire joints to prevent short circuits. Use connectors for stable, secure wire connections. Heat shrink tubing is also useful for protection.
Multimeter
A multimeter tests electrical connections and voltage levels. It helps ensure proper power supply to the camera. This tool avoids wiring errors and damage.
Zip Ties And Mounting Brackets
Zip ties keep wires organized and out of the way. Mounting brackets hold the camera firmly in place. Both improve the overall installation quality.
Preparing Your Vehicle
Preparing your vehicle for a reverse camera installation is an important first step. It ensures a smooth and safe setup. Start by gathering the tools and materials you need. Turn off your vehicle and disconnect the battery to avoid any electrical issues. Clean the rear area of your car to work easily and avoid damage.
Locating The Power Source
Find the reverse light wires in your vehicle’s tail light assembly. These wires provide power to the reverse camera. Use a test light or multimeter to identify the correct wires. Tap into these wires carefully. This allows the camera to activate automatically when you shift into reverse gear.
Accessing The Rear Bumper
Remove any covers or panels blocking access to the rear bumper. This area is where you will mount the reverse camera. Use a screwdriver or panel removal tool to avoid breaking clips. Check behind the bumper for a good spot to secure the camera. Make sure the location gives a clear view behind the vehicle.
Mounting The Camera
Mounting the reverse camera correctly is very important for clear and useful images. This step ensures you see the right area behind your vehicle. A well-mounted camera helps avoid blind spots and improves safety while parking or reversing. Follow the instructions below to mount your camera properly.
Positioning The Camera
Choose a spot at the back center of your vehicle. It should give a wide view of the area behind. Usually, the best place is near the license plate or on the bumper. Avoid placing it too high or too low. The camera lens must face directly backward. This avoids distorted or angled views. Make sure nothing blocks the camera’s view, like dirt or car parts.
Securing The Camera
Use screws or strong adhesive to fix the camera tightly. Check that it does not move or shake. A loose camera gives unclear or shaky images. Tighten all screws securely, but do not over-tighten. Keep the wires safe and hidden to avoid damage. Test the camera by shifting your car into reverse. Adjust the camera angle if the view is off-center.
Wiring The Camera
Wiring the reverse camera is a key step for a clear view behind your vehicle. This step connects the camera to your car’s power and display system. Proper wiring ensures the camera works every time you reverse.
Running The Cables
Start by choosing the best path for the cables. Avoid sharp edges and moving parts. Use existing gaps or panels to hide wires. Secure cables with clips or tape. Keep the wires away from heat sources. This prevents damage and signal loss.
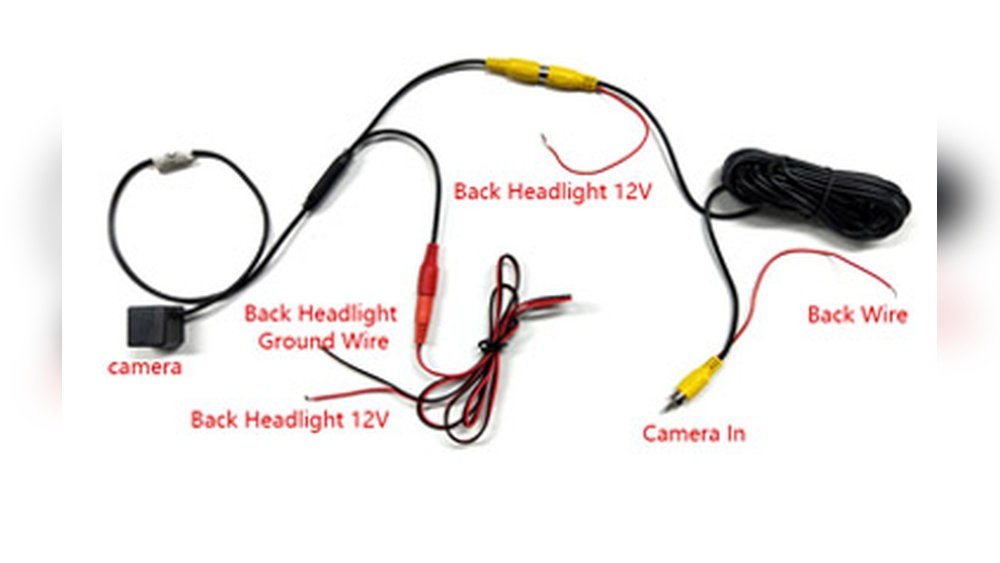
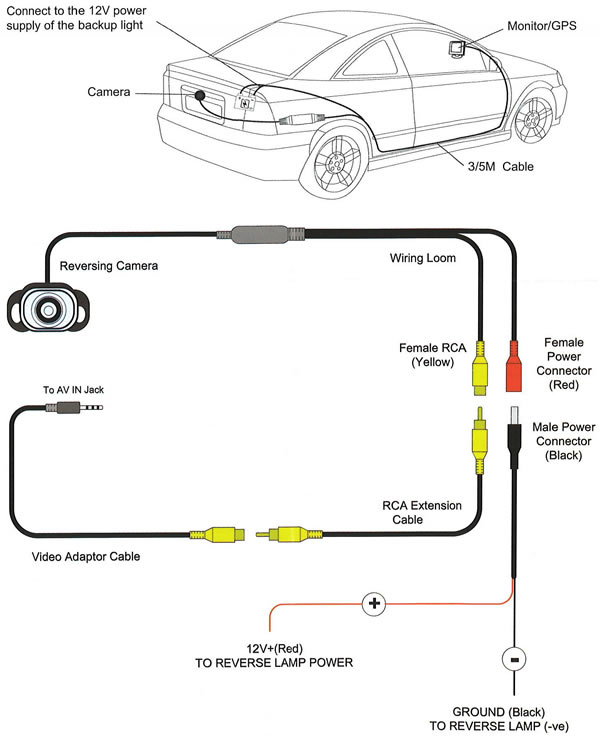
Connecting To Power And Display
Connect the camera’s power wire to the reverse light circuit. This makes the camera turn on when you reverse. Use a fuse tap or splice connector for a safe connection. Attach the video cable to the display unit in your car. Check all connections for tightness. Test the camera before finishing the installation.

Testing The Camera
Testing the reverse camera is a key step after installation. It ensures the camera works well and shows clear images. Testing helps find any problems early and fix them quickly. This keeps your parking and reversing safe.
Checking The Image Quality
Turn on the reverse gear to activate the camera. Look at the screen for the image. Check if the picture is clear and sharp. Make sure colors look natural and not washed out. Watch for any flickering or lines on the screen. These issues mean the camera or wiring may need adjustment.
Test the camera in different lighting. Check during daylight and at night. This shows how well the camera performs in all conditions. A good camera gives a clear view no matter the time.
Adjusting The Camera Angle
Look at the camera view on the monitor. The angle should show the area behind your vehicle clearly. Adjust the camera if the view is too high or low. The camera lens should focus on the ground and the rear bumper.
Loosen the camera mount slightly to move the angle. Tighten it again once you find the best position. Check the view again after adjustment. Repeat until you get a perfect angle for safe reversing.
Troubleshooting Common Issues
Installing a reverse camera can make parking safer and easier. Sometimes, issues arise during or after installation. Troubleshooting these common problems helps you fix the camera quickly.
Knowing what to check saves time and avoids frustration. Most problems have simple solutions.
Check The Power Supply
Ensure the camera gets power from the car’s reverse light circuit. Use a multimeter to test voltage. Loose or damaged wires can stop power flow. Secure all connections tightly for steady power.
Inspect The Camera Lens
Dirty or scratched lenses blur the image. Clean the lens with a soft cloth. Avoid harsh chemicals that can damage it. If scratches are deep, consider replacing the camera.
Verify Video Signal Connection
Check the video cable linking the camera to the display. Loose or broken cables block the signal. Reconnect cables firmly and replace damaged wires. A clear video feed depends on good connections.
Adjust Camera Angle
Improper camera angle causes poor visibility. Adjust the camera to cover the rear view properly. Test by shifting the car into reverse. Fine-tune the angle until the image shows the desired area.
Test The Display Unit
The monitor or head unit may cause issues. Ensure it supports the camera’s video format. Reset or update the display software if needed. Try connecting another video source to check the screen.

Tips For Maintenance
Maintaining a reverse camera keeps it working clearly and reliably. Regular care extends its life and improves safety. Simple steps help avoid common problems with the camera and wiring.
Cleaning The Camera Lens
Use a soft cloth to clean the lens. Avoid harsh chemicals that can damage the surface. Clean the lens often to remove dirt and dust. Clear lens means a clear view when reversing.
Checking For Loose Connections
Inspect the wiring regularly. Look for loose or damaged cables. Secure any loose connections to avoid signal loss. Tight connections ensure the camera sends a steady image.
Protecting Against Water Damage
Make sure the camera housing seals well. Check for cracks where water might enter. Use waterproof tape if needed to cover exposed areas. Water damage can cause the camera to fail.
Testing The Camera Regularly
Turn on the camera and check the display often. Confirm the image is clear and stable. Early testing helps spot issues before they become serious. Consistent checks keep the system reliable.
Updating Camera Software
Some cameras have software updates. Check the manufacturer’s website for updates. Install updates to fix bugs and improve performance. Updated software keeps the camera working smoothly.
Frequently Asked Questions
How Do I Connect A Reverse Camera To My Car?
To connect a reverse camera, first mount the camera at the rear. Then, run the video cable to the display unit. Connect the camera’s power wire to the reverse light circuit for automatic activation when reversing.
What Tools Are Needed To Install A Reverse Camera?
You typically need a screwdriver, wire stripper, electrical tape, and a drill. A multimeter helps check connections. Some kits include mounting brackets and cables. Always follow the specific instructions provided with your camera model.
Can I Install A Reverse Camera Without Professional Help?
Yes, many reverse cameras come with user-friendly instructions. Basic wiring and mounting skills are necessary. Take safety precautions and disconnect the car battery before installation. Watch tutorial videos if you are unsure about any step.
How Do I Test If My Reverse Camera Is Working?
Turn on the car and shift to reverse gear. The camera should activate, displaying the rear view on the screen. Check for clear image quality and proper angle. If the image is missing, recheck the wiring and connections.
Conclusion
Connecting a reverse camera is easier than it seems. Follow each step with care and patience. Check all wires and connections before finalizing. Test the camera to ensure it works well. A clear view behind your vehicle boosts safety. Take your time for the best results.
You will feel more confident while parking. Simple tools and instructions make the task smooth. Enjoy the added convenience every time you reverse.