Are you ready to upgrade your car’s sound system but don’t have a wiring harness? Don’t worry—you can still install your new car stereo yourself.
It might sound tricky, but with the right steps, you can make it happen quickly and safely. Imagine enjoying your favorite music with better sound, all without expensive tools or professional help. Keep reading, and you’ll discover simple tips that make the process clear and manageable.
By the end, you’ll have the confidence to install your car stereo without a wiring harness and enjoy every drive like never before.
Tools And Materials Needed
Installing a car stereo without a wiring harness needs specific tools and materials. Having the right items saves time and prevents damage. This section lists what you need for a smooth installation process.
Essential Tools
- Screwdrivers: Both flathead and Phillips for removing panels
- Wire Strippers: To strip insulation from wires easily
- Crimping Tool: For securing wire connectors firmly
- Electrical Tape: To insulate wire connections
- Multimeter: To test electrical connections and voltage
- Panel Removal Tool: To remove dashboard panels without damage
- Soldering Iron (optional): For a stronger wire connection
Required Materials
- Aftermarket Stereo Unit: The new car stereo to install
- Wire Connectors: Butt connectors or quick splices
- Electrical Wire: Usually 16 or 18 gauge for connections
- Heat Shrink Tubing: To protect and insulate soldered wires
- Mounting Kit: Brackets and screws for securing the stereo
- Wiring Diagram: For your vehicle’s specific wiring setup

Preparing Your Car Stereo
Preparing your car stereo is a key step before installing a new one without a wiring harness. This process helps ensure a smooth setup and prevents damage to your vehicle’s electrical system. Taking time here saves effort later and guarantees the best sound performance.
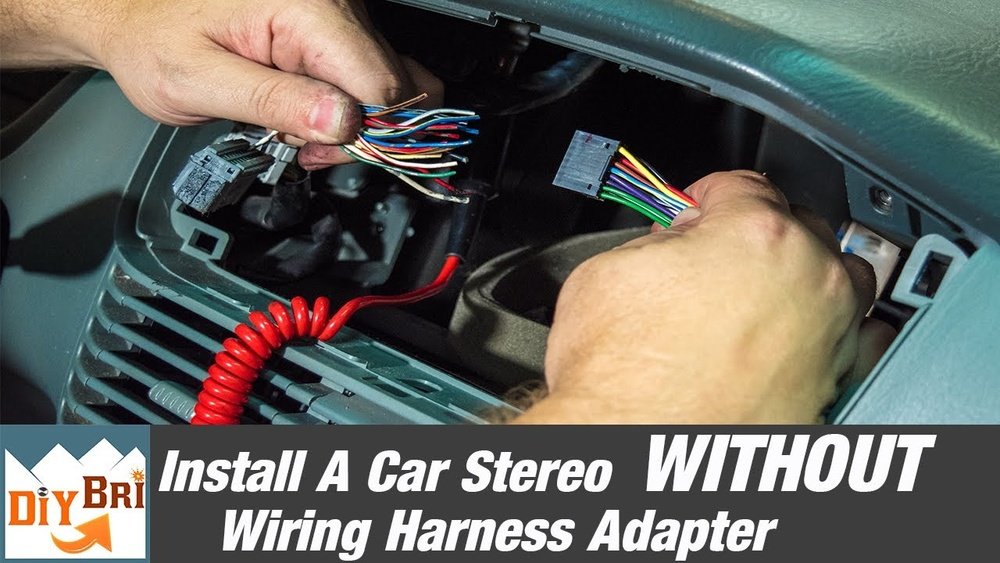
Start by removing the old stereo carefully. Then, inspect the wiring for any damage or issues. These steps create a clean base for your new stereo installation.
Removing Old Stereo
Begin by turning off your car and disconnecting the battery. This prevents electrical shocks and short circuits. Use a panel removal tool or a flat screwdriver to gently pry off the dashboard panels. Keep screws and clips in a safe place to avoid losing them.
Locate the mounting screws or bolts holding the old stereo in place. Unscrew them carefully. Pull the stereo out slowly, as wires will still be connected at the back. Disconnect the wiring harness and antenna cable from the old unit. Set the old stereo aside.
Inspecting Wiring
Look closely at the exposed wires behind the stereo slot. Check for frayed wires, corrosion, or loose connections. Damaged wiring can cause poor audio or electrical problems. If wires look worn, use electrical tape or replace them before continuing.
Identify each wire by color and function. Common wires include power, ground, speaker wires, and antenna. Label them with tape to avoid confusion later. Clean any dirt or dust around the wiring area. Clear wiring helps ensure a strong connection to your new stereo.
Identifying Car Wires
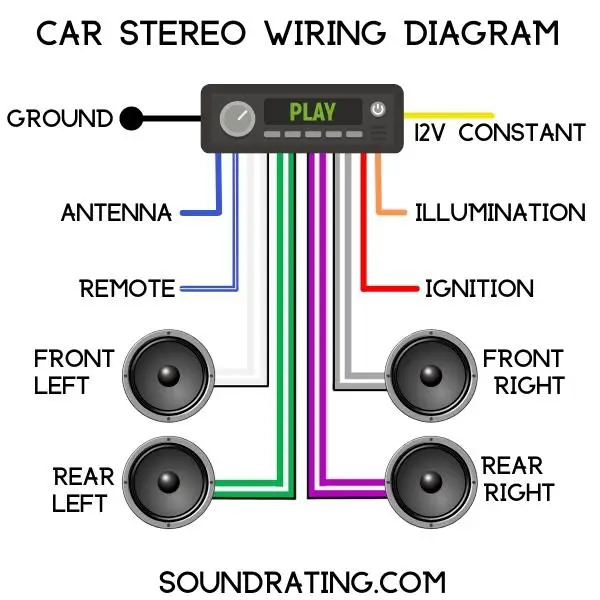
Identifying car wires is the first step in installing a car stereo without a wiring harness. Each wire in your car has a specific role. Knowing these roles helps connect the stereo correctly. This avoids damage and ensures the stereo works well.
Car wires come in different colors. These colors show their functions. A clear understanding of these colors saves time and effort. It also makes the installation safer and more reliable.
Color Codes And Functions
Car wires use standard color codes. These codes tell you what each wire does. For example, red wires often carry power from the battery. Black wires usually connect to the ground. Yellow wires provide constant power to keep memory settings.
Blue wires often control antenna or amplifier power. White and gray wires connect to front speakers. Green and purple wires link to rear speakers. Each speaker wire has a positive and negative side. Positive wires have a solid color. Negative wires have the same color with a stripe.
Testing Wire Connections
Testing wires confirms their function before connecting. Use a multimeter to check power and ground wires. Set the multimeter to measure voltage. Touch the probe to the wire and ground. A reading of 12 volts means a power wire.
Test speaker wires with a continuity tester. This helps find positive and negative wires. Label each wire after testing. This prevents confusion during installation. Accurate testing makes your stereo work perfectly.
:max_bytes(150000):strip_icc()/GettyImages-570258697-56a1051b3df78cafdaa7eeca.jpg)
Connecting Wires Without Harness
Connecting wires without a harness can feel tricky at first. It requires careful work to ensure each wire goes to the right place. Knowing how to identify and link wires is key. This step is important to make your car stereo work properly and safely.
Matching Speaker Wires
Start by finding the speaker wires in your car. Usually, they come in pairs with one wire for positive and one for negative. Use a wiring diagram for your vehicle or test wires with a multimeter. Connect the car’s speaker wires to the stereo wires with the same color or function. Twist the wires together tightly for a good connection.
Handling Power And Ground Wires
The power wire brings electricity to the stereo. It is often red. The ground wire, usually black, completes the electrical circuit. Connect the red power wire to the car’s 12V power source. Attach the black ground wire to a solid metal part of the car frame. This prevents electrical issues and keeps the stereo safe.
Securing Connections
Once wires are matched and connected, secure each connection well. Use electrical tape or wire connectors to cover exposed wires. This stops short circuits and keeps wires from coming loose. Check each connection by gently pulling on the wires. Proper securing extends the stereo’s life and avoids problems on the road.
Mounting The Stereo Unit
Mounting the stereo unit is a key step in installing a car stereo without a wiring harness. The stereo must fit well in the dashboard opening. Secure mounting keeps the stereo stable and safe during driving. It also helps avoid rattles and poor connections. This section explains how to fit the stereo and use mounting kits for a solid install.
Fitting The Stereo
Start by checking the stereo size. Most car stereos are standard single or double DIN size. Measure the dashboard opening to ensure the stereo fits. Slide the stereo gently into the space. Do not force it. If the stereo does not fit, you may need an adapter or trim panel. These parts fill gaps and make the stereo sit flush. Once the stereo fits, lock it in place using the side tabs or screws. This prevents movement while driving.
Using Mounting Kits
Mounting kits help attach the stereo securely without a wiring harness. They include brackets, screws, and trim pieces. Choose a kit made for your car model and stereo size. Attach the brackets to the stereo first. Then connect the brackets to the dashboard frame. Use the screws provided to tighten everything. The trim pieces cover gaps around the stereo. This gives a clean look and protects wiring. Mounting kits make the installation easier and neater.
Testing The Installation
Testing the installation is a key step after installing a car stereo without a wiring harness. This step ensures everything works correctly. You avoid damage to the stereo or vehicle electrical system. Careful testing helps catch any wiring errors early.
Powering On
Start by turning on the car ignition. The stereo should power up without issues. Watch for any warning lights or error messages. If the stereo stays off, check all connections again. Make sure the battery wire and ground wire are secure. A steady power supply is crucial for the stereo to work.
Sound And Functionality Check
Play music or radio to test the sound output. Listen for clear and balanced audio from all speakers. Adjust the volume to ensure it changes smoothly. Test other features like Bluetooth, USB, or CD player. Check if controls respond quickly and correctly. Confirm all functions operate as expected before finalizing the setup.
Troubleshooting Common Issues
Installing a car stereo without a wiring harness can be tricky. Problems may come up during or after installation. Knowing how to fix common issues saves time and frustration. This guide helps you solve power, sound, and noise problems easily.
No Power Or Sound
Check if the stereo turns on. No power usually means a wiring problem. Verify all wire connections. Make sure the battery wire connects to the car’s power source. Test the fuse; replace it if blown. Confirm the ground wire is secure and touching metal. A loose ground can stop the stereo from working.
Sound issues often come from speaker wires. Ensure speaker wires are connected correctly. Wrong connections cause no sound or poor audio. Check the volume and mute settings on the stereo. Sometimes simple settings cause no sound.
Interference And Noise
Noise in the speakers often comes from poor grounding. Ground wires must connect to clean, bare metal. Avoid rusty or painted spots. Use a multimeter to test for ground continuity. Electrical interference can also cause static or buzzing sounds.
Keep power wires away from antenna cables. Crossing wires may cause noise. Replace cheap or damaged RCA cables with good quality ones. Shielded cables reduce interference. Try turning off other electrical devices in the car to find noise sources.
Safety Tips During Installation
Installing a car stereo without a wiring harness can be tricky. Safety should be your top priority. Following safety tips prevents accidents and damage. Understanding basic precautions helps you work with confidence.
Disconnecting Battery
Always disconnect the car battery before starting. This stops electrical shocks and short circuits. Remove the negative terminal first to cut power. Use a wrench to loosen the clamp gently. Keep the cable away from the battery to avoid contact. This simple step protects you and your vehicle.
Avoiding Wire Damage
Handle wires with care to prevent damage. Do not pull or twist wires hard. Use wire strippers to remove insulation cleanly. Check wires for cracks or breaks before connecting. Avoid sharp edges that can cut wires inside the dashboard. Secure wires properly to stop them from moving or rubbing. Good wire care ensures a safe and lasting installation.
Frequently Asked Questions
How Do I Install A Car Stereo Without A Wiring Harness?
To install without a wiring harness, carefully match and connect each wire by function. Use a wiring diagram for accuracy. Secure connections with electrical tape or connectors to prevent shorts. Test the stereo before finalizing the setup.
Can I Safely Install A Car Stereo Without A Wiring Harness?
Yes, it is safe if you correctly identify and connect all wires. Use proper tools and follow instructions. Avoid loose connections to prevent electrical issues. If unsure, consult a professional to ensure safety and functionality.
What Tools Do I Need To Install A Stereo Without A Harness?
You will need wire strippers, electrical tape, a multimeter, crimp connectors, and screwdrivers. These tools help you strip, connect, and test wires accurately. Proper tools ensure a secure and reliable installation without a harness.
How To Identify Wires Without A Wiring Harness?
Use a wiring diagram for your vehicle model. Identify wire colors and functions like power, ground, and speakers. A multimeter can test wire voltage and continuity. Label wires as you go to avoid confusion during installation.
Conclusion
Installing a car stereo without a wiring harness can seem tricky. Stay patient and follow each step carefully. Double-check all connections before powering the stereo. Use proper tools to avoid damage or mistakes. Take your time to ensure a safe and secure fit.
Enjoy clear sound and improved driving experience once done. This method saves money and works well with basic wiring knowledge. Keep this guide handy for future car audio upgrades. Simple steps lead to successful stereo installation without extra parts.