Are you tired of your factory car stereo and ready for an upgrade? Removing it might seem tricky, but with the right steps, you can do it yourself without spending a fortune.
Imagine having the freedom to install a new system that fits your style and boosts your driving experience. In this guide, you’ll discover simple, clear instructions to safely take out your old stereo. Keep reading—you’re just moments away from transforming your car’s sound system and enjoying music the way you want.

Tools Needed
Removing a factory car stereo needs the right tools. Using proper tools makes the process safe and easy. Without them, you risk damaging your car or stereo. Prepare your tools before starting the removal.
Essential Tools For Removal
A set of basic tools is necessary to remove a car stereo. First, a flat-head screwdriver helps to pry off trim panels carefully. A Phillips screwdriver is useful for removing screws that hold the stereo in place. A panel removal tool, usually made of plastic, prevents scratches on your dashboard. Wire cutters or strippers are needed if you disconnect any wiring. Lastly, a socket wrench set helps with bolts inside the dashboard.
Optional Accessories
Some extra tools can make the job easier but are not required. A magnetic tray keeps screws and small parts safe during removal. A flashlight improves visibility in dark areas behind the dash. Gloves protect your hands from sharp edges. Labeling tape and a marker help mark wires for easier reinstallation. These accessories speed up the process and reduce mistakes.

Preparing Your Car
Preparing your car before removing the factory stereo is important. It keeps you safe and protects your vehicle’s electronics. Taking small steps first makes the process smoother and safer. Follow these simple steps to get ready.
Disconnecting The Battery
Start by disconnecting the car battery. This stops any electrical current that may cause shocks. Use a wrench to loosen the negative terminal first. Remove the cable and keep it away from the battery. This step prevents short circuits during the stereo removal.
Clearing The Workspace
Clear the area around your car’s dashboard. Remove any loose items or decorations. Make sure you have enough light to see all screws and clips. Keep tools nearby for easy access. A clean workspace helps avoid losing small parts.
Accessing The Stereo
Accessing the stereo is the first step in removing a factory car stereo. It requires careful handling of your car’s interior. The process involves removing parts around the stereo to reach the screws and bolts holding it in place.
Start slowly and avoid using too much force. This prevents damage to the panels and clips. The right tools make the job easier and safer for your car.
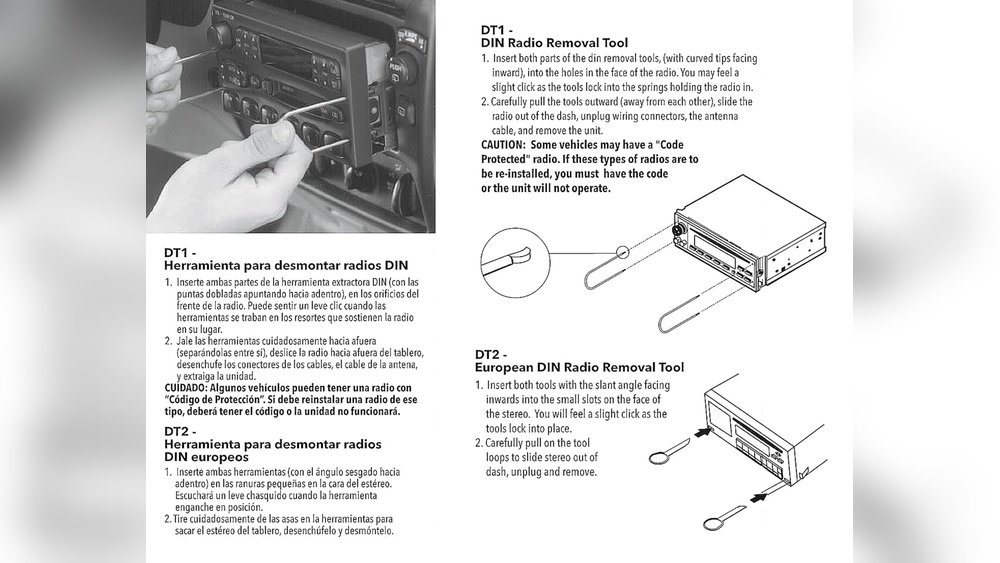
Removing Trim Panels
Trim panels cover the edges of the stereo and dashboard. Use a plastic pry tool to gently lift these panels. Avoid metal tools to prevent scratching or breaking the trim.
Work around the panel edges slowly. Some clips hold the panels tight. Listen for soft clicks as clips release. Remove the panel completely to expose the stereo frame.
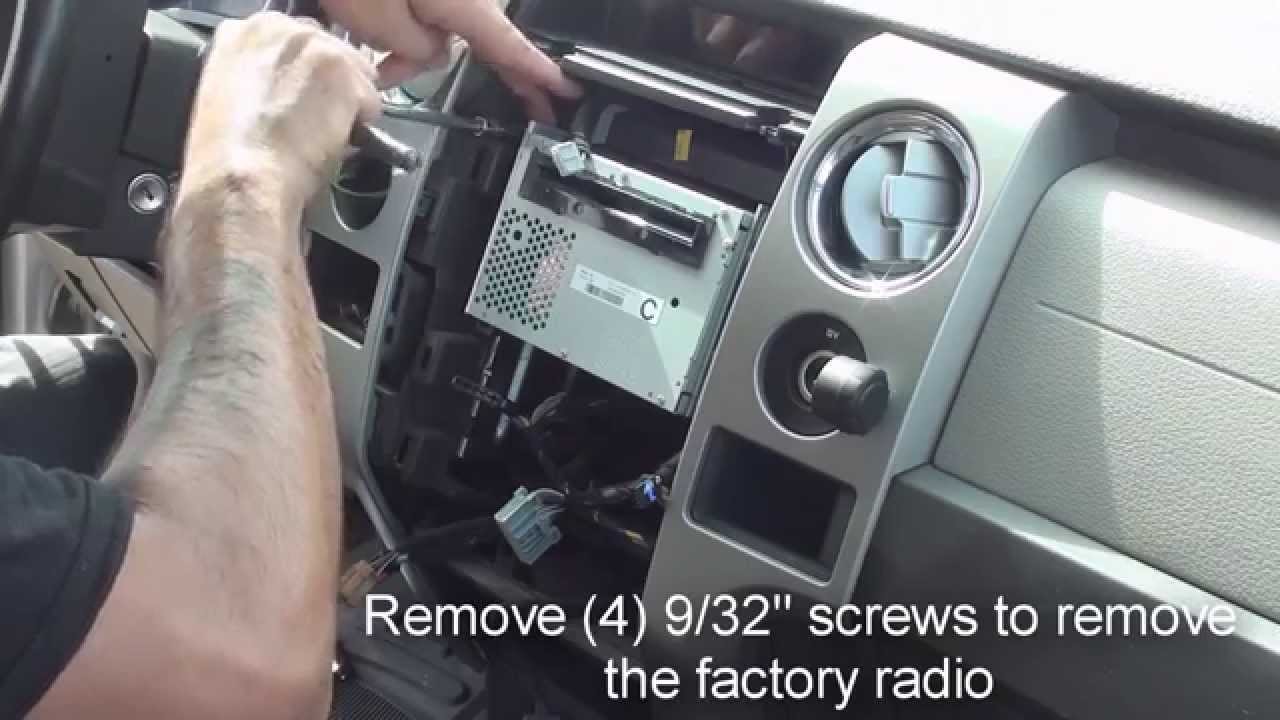
Unfastening Screws And Bolts
Screws and bolts secure the stereo inside the dashboard. Find a screwdriver or socket wrench that fits them well. Turn counterclockwise to loosen.
Keep screws and bolts in a safe place. Some may be small and easy to lose. After removing all fasteners, carefully pull the stereo out a little.
Detaching The Stereo
Detaching the stereo from your car is the next step after removing any trim or panels. Handle the unit carefully to avoid damage. This part requires gentle pulling and careful unplugging of wires. Follow these simple steps to remove the factory stereo safely.
Pulling Out The Unit
First, grasp the stereo firmly with both hands. Pull it straight out from the dashboard. Avoid twisting or bending the unit. Use steady force. The stereo should slide out smoothly. If it feels stuck, check for hidden screws or clips. Do not rush this step.
Disconnecting Wiring Harnesses
After pulling the unit out, locate the wiring harnesses at the back. Press the release tabs on the connectors. Gently pull each harness free. Take care not to pull on the wires themselves. Disconnect any antenna cables too. Keep the wires organized for reinstallation or replacement.
Handling Common Issues
Removing a factory car stereo can sometimes bring unexpected challenges. This section covers common issues and how to handle them. Understanding these problems helps to avoid damage and saves time.
Dealing With Stuck Units
Car stereos can get stuck due to tight clips or screws. Use the right tools, like a plastic pry tool, to avoid scratching the dashboard. Gently wiggle the stereo to loosen it. Avoid pulling hard as this can break the unit or wires. If screws block removal, check for hidden screws under panels or inside glove compartments.
Managing Wiring Complexities
Factory stereos have many wires connected to power and speakers. Label each wire before disconnecting to make reinstallation easier. Use a wiring diagram specific to your car model to identify wires. Disconnect the battery before handling wires to prevent short circuits. Handle wires carefully to avoid cuts or damage to connectors.
After Removal Steps
After removing your factory car stereo, some important steps follow. These steps help ensure safety and prepare your car for the new stereo. Taking time here makes installation easier and prevents problems later.
Inspecting The Wiring
Check all wires carefully after stereo removal. Look for any cuts, frays, or exposed wires. Damaged wiring can cause shorts or failure of the new stereo. Make sure all wires are clean and dry. Use electrical tape to cover any bare wire ends. Confirm the wiring matches the car’s wiring diagram. This step avoids confusion during installation and keeps your car safe.
Preparing For New Stereo Installation
Clear out the stereo cavity before installing the new unit. Remove any dust, debris, or leftover parts from the old stereo. Test fit the new stereo bracket or mounting kit. Adjust it to fit tightly without forcing. Connect wiring harness adapters to make new stereo connections easier. Double-check your tools and parts are ready. Preparation saves time and prevents damage during installation.
Frequently Asked Questions
How Do I Safely Remove A Factory Car Stereo?
To remove a factory car stereo safely, first disconnect the car battery. Use proper tools like panel removers to avoid damage. Gently pry off the dashboard panels, unscrew mounting brackets, and carefully disconnect wiring harnesses before fully removing the stereo unit.
What Tools Are Needed To Remove A Factory Car Stereo?
You typically need panel removal tools, a screwdriver set, and possibly stereo removal keys. A trim removal tool prevents damage to dashboard panels. Having the right tools ensures a smooth and safe stereo removal process without harming your car’s interior.
Can I Remove A Factory Stereo Without Damaging My Car?
Yes, by using the right tools and following proper steps. Disconnect the battery to avoid electrical issues. Use plastic trim tools to avoid scratches. Carefully unplug wiring harnesses and screws to keep everything intact for reinstallation or upgrades.
How Long Does It Take To Remove A Factory Car Stereo?
Removing a factory car stereo usually takes 15 to 30 minutes. Time depends on your car model and your experience. Being cautious and organized speeds up the process and prevents damage to the stereo or vehicle interior.
Conclusion
Removing a factory car stereo can be simple with the right steps. Take your time and follow instructions carefully. Use the proper tools to avoid damage. Keep all screws and parts safe for reassembly. Double-check connections before installing a new stereo.
This guide helps you save money and learn a new skill. Enjoy your car’s improved sound system soon. Try it yourself and feel confident with the process.