If you own a Jeep Wrangler 1987, you know it is built for adventure and tough terrain. But even the strongest vehicles need maintenance. One of the jobs that scares many Jeep owners is removing the rear wheel bearing. This task seems difficult if you are new to car repairs, but with the right tools and clear instructions, you can do it yourself and save money. Taking care of your Jeep’s bearings is important for safety and smooth driving, especially if you take your Wrangler off-road. In this guide, you will learn every step to remove the rear bearing wheel from your 1987 Jeep Wrangler, along with practical tips, common mistakes to avoid, and a deeper understanding of why this repair matters.
Understanding Rear Wheel Bearings In Jeep Wrangler 1987
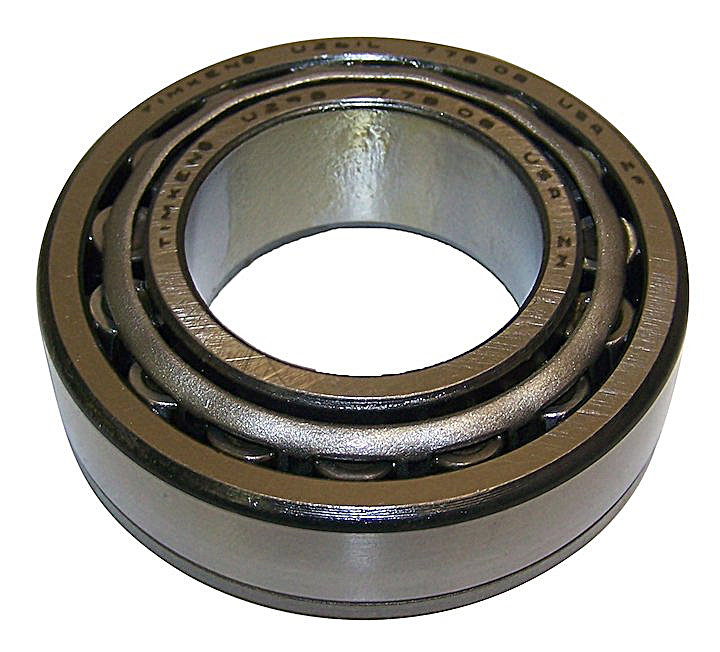
A wheel bearing is a small part, but it has a big job. It sits inside the wheel hub, letting the wheel spin with low friction. In a 1987 Jeep Wrangler, the rear wheel bearings are essential because they help support the weight of the vehicle and keep your ride stable—especially during turns or rough driving.
Over time, these bearings can wear out from heat, dirt, water, or just regular use. When they fail, you might hear grinding or humming noises, feel vibrations, or notice the wheel moving more than it should. Ignoring this can lead to dangerous situations, including losing control of your Jeep.
Tools And Supplies You Will Need
Before you start, having the right tools is crucial. Many beginners make the mistake of starting with the wrong or missing tools, which can turn a simple job into a headache.
- Jack and jack stands (never work under a vehicle with just a jack)
- Lug wrench
- Socket set and ratchet (both metric and SAE sizes)
- Breaker bar
- Flathead screwdriver
- Hammer or mallet
- Needle-nose pliers
- Bearing puller (for stubborn bearings)
- Slide hammer (optional, but helpful)
- Torque wrench
- Drain pan (for catching axle fluid)
- Shop rags or paper towels
- Grease (for new bearing installation)
- Replacement rear wheel bearing and seal
- Gear oil (for refill)
- Gasket scraper or razor blade
- Seal driver or large socket (for seal installation)
- Safety glasses and gloves
Having all these items ready before you start will save you time and prevent frustration.
Preparation And Safety Steps
Working on your Jeep’s rear bearings involves lifting the vehicle and handling heavy parts. Safety should always come first.
- Park on a flat, solid surface. Engage the parking brake and block the front wheels to prevent rolling.
- Loosen the rear wheel lug nuts slightly before lifting the Jeep.
- Use your jack to lift the rear axle, then place jack stands under the axle or frame. Never rely on the jack alone.
- Remove the rear wheels completely.
- Wear safety glasses and gloves to protect yourself from debris and sharp edges.
Many beginners skip the wheel chocks or jack stands, which is risky. Take a few extra minutes to do this right.
Step-by-step: Removing The Rear Wheel Bearing
Now let’s get into the details. Follow these steps carefully to avoid mistakes and damage to your Jeep.
1. Remove The Brake Drum Or Rotor
- If your Jeep has drum brakes, you will need to pull off the drum. Sometimes rust or corrosion can make this hard. Tap gently with a mallet if needed.
- For disc brakes, remove the caliper bolts, take off the caliper, and hang it with a wire (do not let it dangle by the brake hose). Then, slide off the rotor.
2. Remove The Axle Shaft
- The Jeep Wrangler 1987 uses a Dana 35 or AMC 20 axle. The steps are similar for both, but check your model.
- Locate the differential cover in the center of the axle. Place a drain pan underneath.
- Remove the bolts holding the cover, letting the gear oil drain out.
- Look inside the differential for a retaining pin or cross shaft. Remove this using the correct socket.
- Find the C-clips (small clips holding the axle shaft in place). Slide the axle shaft inward to access these. Use needle-nose pliers to remove them.
- Carefully pull the axle shaft outward from the axle tube. Be gentle to avoid damaging the seal.
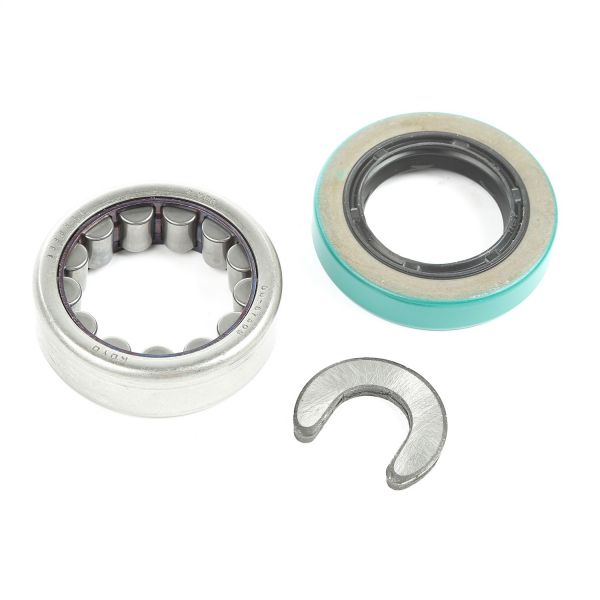
3. Remove The Old Bearing And Seal
- With the axle shaft out, you can see the bearing and seal inside the axle tube.
- Use a bearing puller or slide hammer to remove the bearing. This step can be tough if the bearing is stuck or rusted in place.
- Once the bearing is out, use a seal puller or screwdriver to remove the old seal.
- Clean the inside of the axle tube with rags. Remove any dirt or old grease.
Tip many miss: Inspect the axle shaft for scoring or wear. If the shaft is damaged, installing a new bearing will not fix the problem, and leaks may continue. You might need a repair sleeve or a new axle shaft.
4. Inspect And Prepare For Reassembly
- Check the bearing seat and axle tube for rough spots or corrosion. Clean them carefully.
- Compare the old and new bearings to confirm you have the correct replacement part.
- Lightly coat the new bearing with fresh grease before installation.
5. Install The New Bearing And Seal
- Use a seal driver or a large socket to tap the new bearing into the axle tube. Make sure it sits flush and is not at an angle.
- Install the new seal in the same way. Be gentle—if you bend the seal, it will leak.
6. Reinstall The Axle Shaft
- Carefully slide the axle shaft back into the tube, taking care not to damage the new seal.
- Push the shaft in far enough to expose the end in the differential.
- Reinstall the C-clip on the shaft, then pull the axle outward so the clip seats in the groove.
- Replace the cross shaft (retaining pin) and torque it to specification.
7. Reassemble The Differential
- Scrape off any old gasket material from the differential cover and housing.
- Apply a new gasket or sealant.
- Reinstall the cover and torque the bolts evenly.
- Refill the differential with the correct type and amount of gear oil.
8. Reinstall Brakes And Wheels
- Put the brake drum or rotor back in place.
- Reinstall the caliper (if disc brakes) and torque the bolts.
- Mount the wheels and hand-tighten the lug nuts.
9. Lower The Jeep And Finish Up
- Remove the jack stands and lower the Jeep back onto the ground.
- Torque the lug nuts to the correct specification.
- Wipe down the area and check for leaks.
Pro tip: After reassembly, drive the Jeep for a short distance, then re-check the differential oil level and look for leaks around the seal.

Symptoms Of A Bad Rear Wheel Bearing
How do you know if your rear wheel bearing is failing? Some signs are easy to miss, so pay attention to these:
- Grinding or humming noises from the rear, especially when turning
- Vibration that gets worse with speed
- Play or looseness when you shake the wheel by hand
- Grease leaking around the rear wheels
- ABS or brake warning lights (in some models)
Ignoring these symptoms can lead to more expensive repairs, like damaged axle shafts or even total wheel failure.
Common Mistakes And How To Avoid Them
Many Jeep owners make errors during this job. Here are a few you should avoid:
- Not checking the axle shaft for wear – If the shaft is grooved, the new seal will leak.
- Forgetting to refill the differential – Always add new gear oil after removing the cover.
- Installing the bearing or seal crooked – This causes leaks or premature failure.
- Reusing old seals – Always use a new seal with a new bearing.
- Not torquing bolts properly – Under- or over-tightening can cause leaks or damage.
Insider tip: Take photos of each step as you go. If you get lost, these photos will help you reassemble everything correctly.
Comparing Bearing Types And Quality
Not all rear wheel bearings are the same. Some are roller bearings, others are ball bearings, and there are differences in material and brand quality. Using a higher-quality bearing can mean a longer service life and less risk of failure.
Here’s a comparison of common bearing types used in older Jeeps:
| Type | Durability | Cost | Common Use |
|---|---|---|---|
| Ball Bearing | Medium | Low | Light-duty, older vehicles |
| Roller Bearing | High | Medium | Off-road, heavy loads |
| Tapered Roller | Very High | Higher | Performance/off-road |
For a 1987 Jeep Wrangler, roller bearings or tapered roller bearings are best, especially if you use your Jeep off-road.
Cost And Time Estimates
Before starting, it’s good to know what you are committing to. The process can take anywhere from 2 to 4 hours if you are careful and prepared. Here’s a rough breakdown:
| Item | Estimated Cost (USD) | Notes |
|---|---|---|
| Rear wheel bearing & seal kit | $30 – $70 | Per side |
| Gear oil | $10 – $20 | 1-2 quarts |
| Tools (if buying new) | $50 – $150 | Bearing puller, seal driver, etc. |
| Professional labor (if not DIY) | $200 – $350 | Per side |
Doing it yourself can save a lot of money, especially if you already have tools.
When To Replace Both Sides
A common question is whether to replace both rear bearings at the same time. If one bearing fails, the other is likely close to the end of its life—especially in an older Jeep. Replacing both sides means less chance of repeating the job soon.
However, if you are short on time or budget, you can do just the bad side and monitor the other.
Important Torque Specifications
Using the right torque is critical for a safe and lasting repair. For a 1987 Jeep Wrangler, these are typical values (always check your service manual for your exact model):
- Axle shaft retaining bolt: 25-30 ft-lbs
- Differential cover bolts: 30-35 ft-lbs
- Wheel lug nuts: 85-110 ft-lbs
Over-tightening can strip threads or warp parts. Under-tightening can cause leaks or parts to come loose.
Extra Tips For A Smooth Repair
- Clean all surfaces before installing new parts.
- Label bolts and parts as you remove them—many look similar.
- Don’t rush—take your time, especially when removing or installing the bearing and seal.
- Use quality parts from trusted brands.
- Check for leaks after your first drive and re-tighten as needed.
Often missed: If you notice metal shavings or sludge in the differential oil, you might have bigger problems. Consider inspecting gears and bearings inside the differential.
How Rear Wheel Bearing Failure Affects Your Jeep
A bad rear bearing does more than make noise. It can lead to:
- Uneven tire wear
- Reduced fuel efficiency
- Brake problems
- Potential axle or wheel failure
Replacing the bearing keeps your Jeep safe and running smoothly, especially on long trips or tough trails.
Should You Attempt This Repair Yourself?
If you have basic mechanical skills and the right tools, this is a good DIY project. You will learn more about your Jeep, save money, and gain confidence. However, if you are not comfortable or lack the tools, a mechanic can do the job safely.
For more in-depth repair advice, visit the official Jeep website or trusted automotive resources.
Frequently Asked Questions
How Do I Know If My 1987 Jeep Wrangler Rear Wheel Bearing Is Bad?
Listen for humming or grinding noises from the rear wheels, especially when turning. You may also feel vibrations or notice the wheel feels loose. Grease around the wheel or a burning smell can be signs too.
Can I Drive My Jeep If The Rear Wheel Bearing Is Failing?
It is not safe to drive with a bad bearing. The wheel could lock up or even separate from the axle in extreme cases. If you suspect a problem, fix it as soon as possible.
Do I Need Special Tools To Remove The Rear Wheel Bearing?
A bearing puller and seal driver are very helpful, and sometimes necessary. You also need basic hand tools like sockets, wrenches, and a jack. Having the right tools makes the job much easier and safer.
How Often Should Rear Wheel Bearings Be Replaced On A Jeep Wrangler?
There is no fixed schedule. Bearings often last 100,000 miles or more, but off-road driving, water crossings, or heavy loads can shorten their life. Inspect them during regular maintenance or if you notice symptoms.
Is It Better To Replace Both Rear Wheel Bearings At The Same Time?
If one bearing fails, the other may not be far behind, especially in older vehicles. Replacing both at once saves time and reduces the chance of repeating the repair soon.
Taking care of your Jeep Wrangler 1987 means facing repairs like rear wheel bearing replacement. By following these clear steps and tips, you can tackle the job with confidence, save money, and keep your Jeep ready for any adventure. Remember, preparation and patience are your best tools, and learning from each repair makes you a better Jeep owner.