Have you ever wondered how your car stereo actually connects to your vehicle’s electrical system? Understanding a car stereo wiring diagram can save you time, money, and frustration when installing or fixing your sound system.
This simple guide will help you decode those confusing lines and symbols, so you can confidently handle your car’s audio setup. Keep reading—you’re about to discover the key to unlocking a clearer, better-sounding drive.
Basics Of Car Stereo Wiring
Understanding the basics of car stereo wiring is key to installing or fixing your car audio system. A wiring diagram shows how each wire connects to parts inside the stereo and the car. It guides you through the steps and helps avoid mistakes.
Knowing the common wire colors and their roles makes the process easier. You also need to know the parts involved and the right tools to use. These basics help you work safely and correctly on your car stereo.
Common Wire Colors And Their Functions
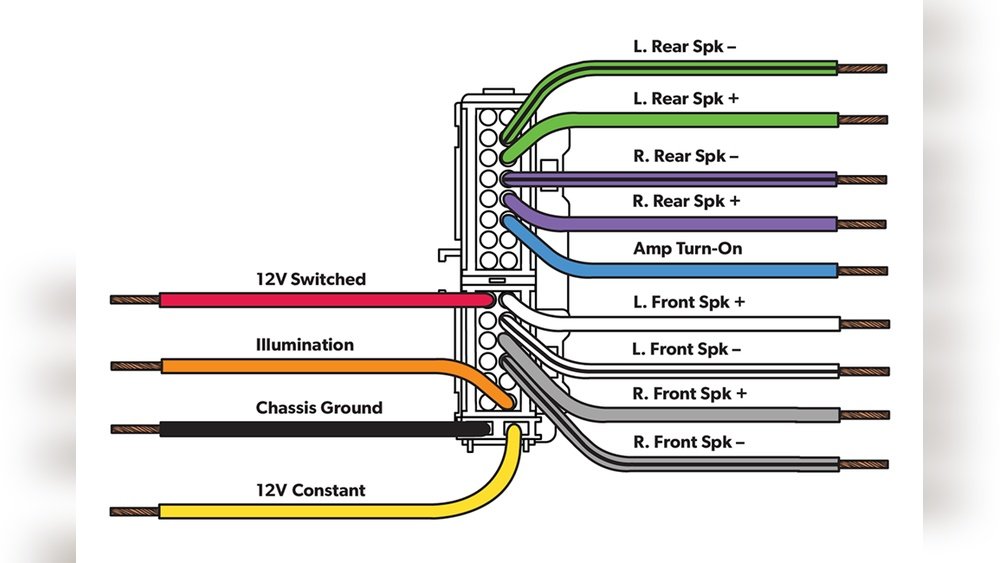
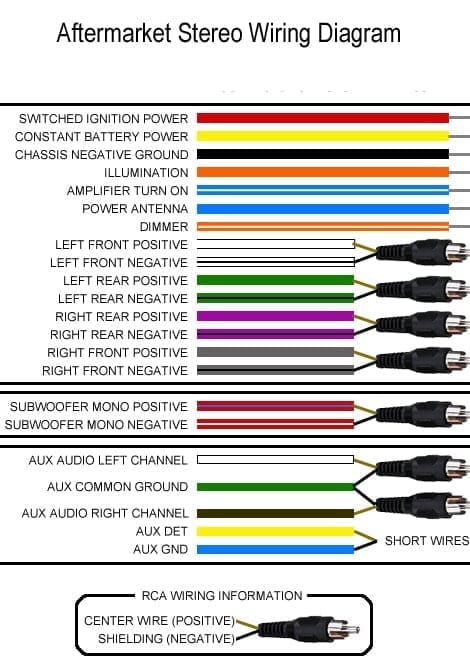
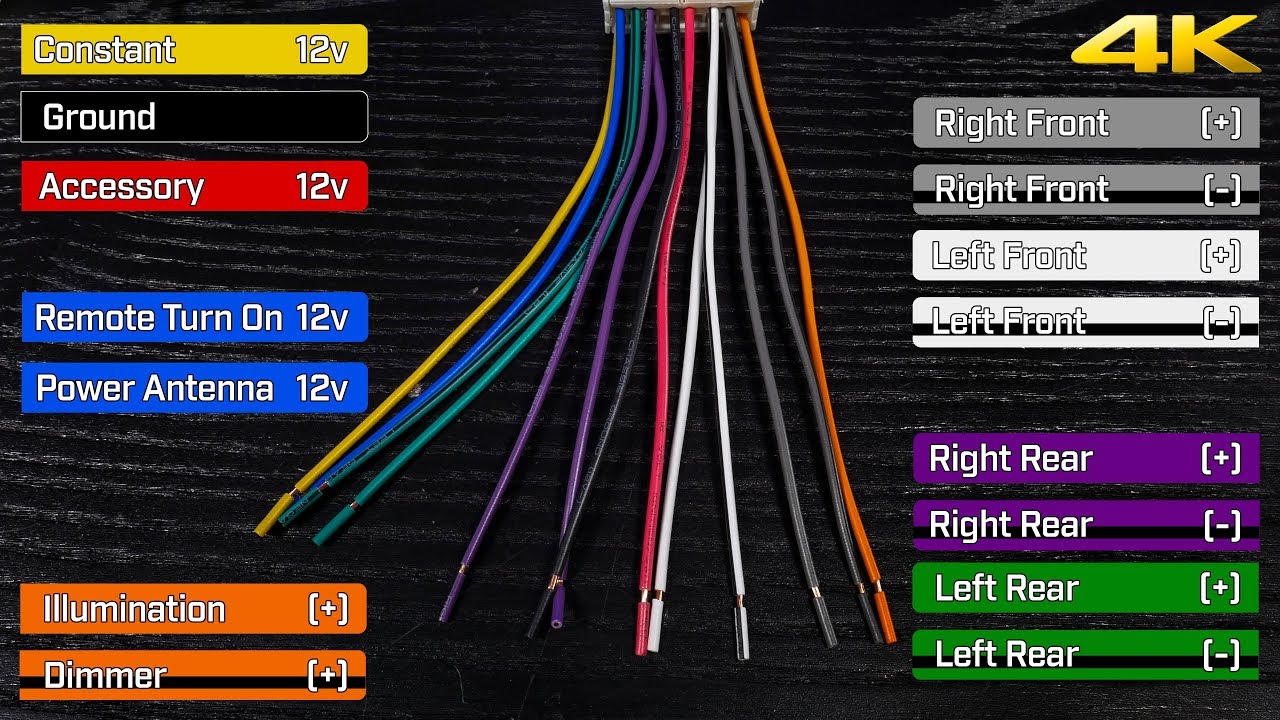
Car stereo wires come in different colors. Each color shows what the wire does. For example, red wires usually carry power to the stereo. Black wires are often ground wires, which complete the electric circuit.
Other colors link to speakers or antennas. White and gray wires connect front left and right speakers. Green and purple wires usually go to rear speakers. Knowing these colors helps you connect everything right.
Essential Components In Wiring
The main parts in car stereo wiring include the power wires, ground wires, speaker wires, and antenna wire. Power wires bring electricity from the car battery. Ground wires let the electric current flow back safely.
Speaker wires send sound signals to each speaker. The antenna wire helps your stereo receive radio signals. Each part has a role in making the car stereo work well.
Tools Needed For Installation
Some tools make wiring easier and safer. Wire strippers remove insulation from wires. Crimping tools help connect wires with connectors. Screwdrivers are needed to open panels and secure wires.
Electrical tape protects wire connections. Multimeters test if wires have power or if they are connected well. Having these tools ready speeds up the installation and reduces errors.
Reading A Car Stereo Wiring Diagram
Reading a car stereo wiring diagram helps you understand how to connect your stereo system. It shows all wires, connections, and components clearly. Learning to read these diagrams makes installation easier and safer.
Symbols And Labels Explained
Car stereo wiring diagrams use symbols to represent parts. Wires, speakers, and power sources each have unique symbols. Labels tell you what each wire does or where it leads. Knowing these signs helps you follow the diagram quickly.
Tracing Wire Paths
Tracing wire paths means following each line from start to end. It shows how wires connect different parts of the stereo system. Follow the lines carefully to see where each wire goes. This helps avoid mistakes during installation.
Identifying Power And Ground Wires
Power wires bring electricity to the stereo. They are usually red or yellow. Ground wires complete the circuit and are often black or brown. Correctly identifying these wires is key to making the stereo work safely.
Preparing For Installation
Preparing for installation is the first step in setting up your car stereo. It helps avoid mistakes and saves time. Proper preparation ensures a smooth and safe process. Follow these steps carefully for best results.
Disconnecting The Battery
Start by disconnecting the car battery. This prevents electrical shocks and short circuits. Use a wrench to remove the negative terminal. Always disconnect the negative side first. This step protects both you and your car’s electronics.
Removing The Old Stereo
Next, remove the old stereo from the dashboard. Use the right tools like screwdrivers or panel removers. Be gentle to avoid breaking clips or wires. Keep screws and parts safe for later use. Note how the wires connect to the old unit.
Checking Compatibility
Check if the new stereo fits your car. Look at the wiring harness and mounting size. Ensure the new system matches your car’s power and speaker connections. Some cars need adapters or extra parts. Confirm compatibility before starting the installation.
Step-by-step Wiring Process
Understanding the step-by-step wiring process is key to installing a car stereo. It helps avoid mistakes and ensures the system works well. This guide breaks down the main wiring steps clearly.
Connecting Power And Ground
Start by connecting the power wire to the car’s battery or fuse box. This wire usually has a red color. Next, find the ground wire, often black. Attach it to a metal part of the car’s body. This connection prevents electrical problems.
Hooking Up Speaker Wires
Identify the speaker wires from the stereo harness. They usually come in pairs with different colors. Match these wires to the car’s speaker wires. Use wire connectors or solder for a solid connection. Proper wiring ensures clear sound from all speakers.
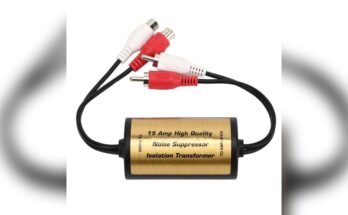
Attaching Antenna And Accessories
Connect the antenna cable to the stereo’s antenna input. This allows radio signals to reach your stereo. Next, plug in any extra accessories like USB ports or amplifiers. These connections enhance your car’s audio experience.
Testing And Troubleshooting
Testing and troubleshooting a car stereo wiring diagram helps find and fix problems. It ensures the stereo works well and sounds great. This process saves time and money by avoiding guesswork. Follow simple steps to check connections, spot issues, and solve sound problems.
Verifying Connections
Check all wires carefully. Make sure each wire is in the right place. Tighten loose connections with a tool. Look for broken or damaged wires. Use a multimeter to test if wires carry power. Confirm ground wires are secure. Proper connections prevent most stereo issues.
Common Wiring Issues
Wrong wire placement causes no sound or static. Damaged wires can cause shorts or no power. Loose wires may cut off sound randomly. Poor grounding leads to buzzing or noise. Faulty connectors reduce signal quality. Identifying these issues helps fix the stereo quickly.
Fixing Sound Problems
Adjust or replace loose wires. Clean dirty connectors for better contact. Replace damaged wires or connectors. Check speaker wires for cuts or breaks. Test the stereo with a different speaker. Fix grounding problems to remove noise. These steps restore clear sound and proper function.
Tips For Safe And Neat Installation
Installing a car stereo requires care and attention. A neat and safe wiring setup helps your stereo work well. It also stops future problems and keeps your car safe. Follow simple tips to organize wires and avoid risks.
Securing Wires
Keep wires tight and fixed. Use clips or ties to hold them in place. Loose wires can catch on parts or get damaged. Secure wires away from moving parts and sharp edges. This prevents breaks and shorts.
Using Wire Connectors
Join wires with proper connectors, not just tape. Connectors provide a strong and safe link. They stop wires from coming loose during driving. Use crimp connectors or solder joints for best results.
Avoiding Electrical Hazards
Check all wires for damage before starting. Avoid crossing power wires with signal wires. Keep wires away from heat sources and water. Use fuses to protect your stereo and car system. Always disconnect the car battery before wiring.
Upgrading Your Car Audio System
Upgrading your car audio system can greatly improve your driving experience. Better sound makes every trip more enjoyable. Understanding your car stereo wiring diagram helps you add new features easily. It shows how each component connects and works together.
Adding Amplifiers And Subwoofers
Amplifiers boost the power of your sound system. They make music louder and clearer. Subwoofers add deep bass that regular speakers lack. A wiring diagram guides you to connect these parts safely. Proper wiring prevents damage and ensures good sound quality.
Integrating Bluetooth And Usb
Bluetooth lets you play music wirelessly from your phone. USB ports allow direct connection for better sound and charging. Wiring diagrams show where to connect these devices. This integration improves convenience and keeps your car tidy.
Customizing Sound Settings
Many systems let you adjust bass, treble, and balance. Custom sound settings create the best listening experience for you. Knowing the wiring layout helps you access these controls. Tuning your audio system matches your personal music taste.

Frequently Asked Questions
What Is A Car Stereo Wiring Diagram?
A car stereo wiring diagram shows how to connect audio system wires. It helps install or repair the stereo correctly and safely. The diagram includes power, ground, speaker, and antenna wires. It ensures proper connections for optimal sound and functionality.
Why Is A Car Stereo Wiring Diagram Important?
It guides users in correctly wiring the stereo system. This prevents electrical shorts, damage, and poor sound quality. The diagram also saves time by clearly showing wire colors and connections. It is essential for safe, efficient stereo installation or troubleshooting.
How Do I Read A Car Stereo Wiring Diagram?
Identify wire colors and their functions first. Then, match each wire to its car stereo terminal. Follow the diagram’s symbols for power, ground, speakers, and accessories. Reading the diagram carefully avoids wrong connections and ensures system performance.
Can I Install A Car Stereo Without A Wiring Diagram?
Technically yes, but it’s risky and not recommended. Without a diagram, you might connect wires incorrectly. This can cause electrical damage or no sound output. A wiring diagram provides clear guidance for safe and effective installation.
Conclusion
A car stereo wiring diagram shows how to connect wires correctly. It helps avoid mistakes and keeps your system safe. Understanding the diagram makes installation easier and faster. You can enjoy better sound and fewer problems. Always check the diagram before starting any work.
It guides you step by step. Knowing this information saves time and money. Simple wiring leads to a clear, strong audio signal. Use the diagram as your map for a smooth setup.