Are you ready to upgrade your car with a stereo that includes a backup camera? Installing these two together can seem tricky, but it’s easier than you think.
Imagine having clear sound for your favorite music and a safe, clear view when you reverse—all in one setup. This guide will walk you through every step, making sure you avoid common mistakes and finish the job confidently. Keep reading, and you’ll have your new stereo and backup camera working perfectly before you know it.

Choosing The Right Stereo And Backup Camera
Choosing the right stereo and backup camera is important for a smooth installation. The right gear fits your needs and your vehicle perfectly. It also ensures you get clear images and good sound quality. Taking time to pick the right products saves hassle later.
Key Features To Look For
Good image quality matters. Look for cameras with high resolution. Night vision helps you see clearly in the dark. Wide viewing angles show more area behind your car. For stereos, check sound clarity and volume control. Touchscreen displays are easy to use. Some models include Bluetooth for hands-free calls and music. Simple controls make driving safer.
Compatibility With Your Vehicle
Not every stereo or camera fits all cars. Check your vehicle’s make and model. Some systems only work with specific cars. Size matters too. The stereo should fit your dashboard slot. Check wiring compatibility for easy connection. Some cameras need a special mount or power source. Matching your vehicle ensures smooth setup and better performance.

Gathering Tools And Materials
Gathering the right tools and materials is the first step to install a stereo with a backup camera. Having everything ready will save time and avoid frustration. This section covers the must-have tools and safety tips for a smooth installation process.
Essential Tools Needed
Start with a screwdriver set, including Phillips and flathead types. A wire stripper helps prepare wires for connections. Use a multimeter to check electrical signals safely. Electrical tape and wire connectors keep wires secure and insulated. A panel removal tool prevents damage to your car’s interior. A drill may be needed to create mounting holes. Have the stereo and backup camera kit handy before starting.
Safety Precautions
Disconnect your car battery before working on electrical parts. Wear safety glasses to protect your eyes from debris. Use gloves to avoid cuts from sharp edges. Work in a well-lit, dry area to prevent accidents. Keep tools organized to avoid losing small parts. Follow the stereo and camera instructions carefully. Take your time; rushing can cause mistakes or damage.
Preparing Your Vehicle
Preparing your vehicle is the first step to install a stereo with a backup camera. This stage ensures safety and makes the installation process smoother. Taking time now helps avoid damage to your car’s electrical system.
Gather all necessary tools before starting. This includes screwdrivers, panel removers, and wire connectors. Clear the area around your dashboard for easy access. Keep a container handy to hold screws and small parts.
Disconnecting The Battery
Start by disconnecting the negative terminal of your car battery. This prevents electrical shock and short circuits. Use a wrench to loosen the terminal clamp. Remove the cable and secure it away from the battery.
Never skip this step. It protects both you and your vehicle’s electronics. Double-check that no power is flowing before moving to the next step.
Removing The Old Stereo
Remove any trim panels around the stereo carefully. Use a panel remover tool to avoid damaging the dashboard. Locate and remove the screws holding the stereo in place.
Gently pull the old stereo out of the dashboard. Disconnect all wiring harnesses and antenna cables. Keep these parts organized for reference during the new installation.
Installing The Backup Camera
Installing the backup camera is a key step for better driving safety. It helps you see behind your vehicle clearly. This guide shows how to place and wire the camera properly.
Follow each step carefully to avoid mistakes. A well-installed camera gives a clear view and works without problems.
Selecting The Mounting Location
Choose a spot at the rear of your vehicle for the camera. The best place is near the license plate. It offers a wide view of the area behind you. Make sure the spot is clean and flat. Avoid places with too much dirt or water exposure. The camera should face straight back, not angled up or down. This ensures a good image on your screen.
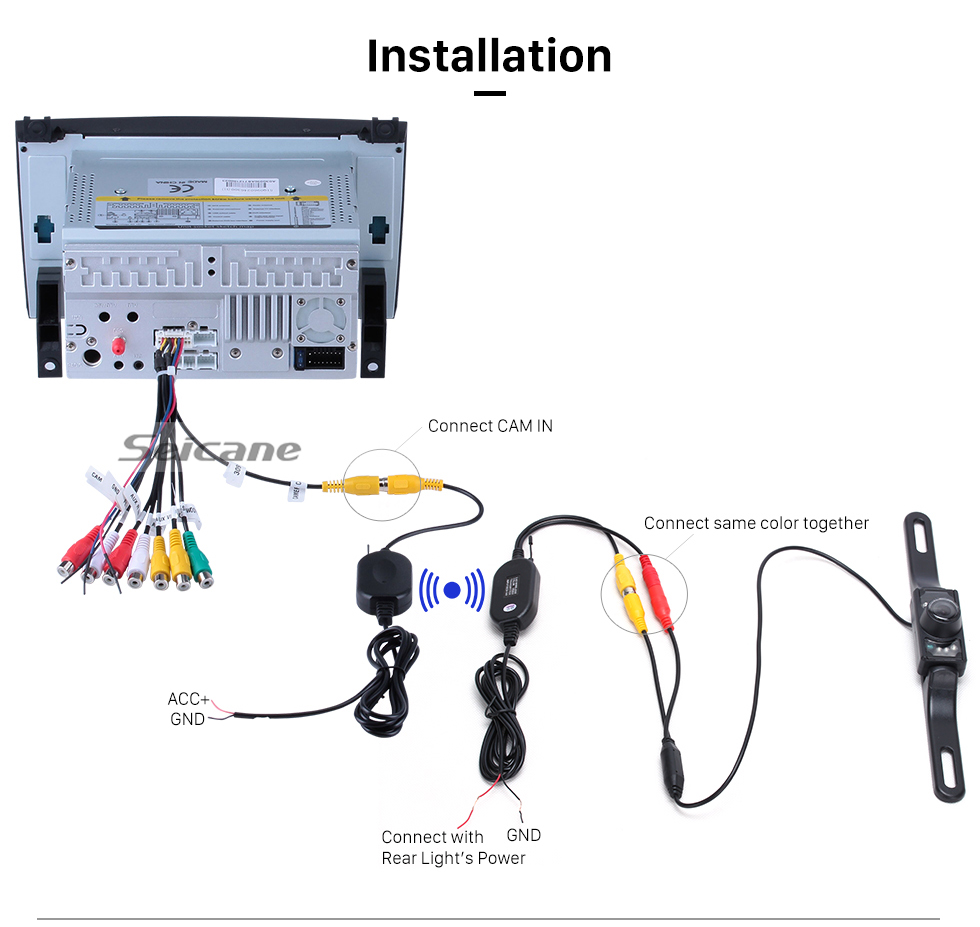
Wiring The Camera
Start by connecting the camera’s power cable to the reverse light wire. This powers the camera only when you reverse. Use a wire tap or connector to join the wires safely. Run the video cable from the camera to the stereo unit inside the car. Hide the wire under trim panels or carpet to keep it neat. Secure all cables with clips or tape to prevent damage. Finally, connect the video cable to the stereo’s backup camera input. Test the camera by shifting into reverse gear. Check for a clear and stable image on the screen.
Wiring The Stereo System
Wiring the stereo system is a key step in installing a stereo with a backup camera. It connects all parts and makes sure everything works well. This process involves several important tasks. Each task must be done carefully to avoid problems later.
Connecting Power And Ground
Start by finding the car’s battery or power source. Connect the stereo’s power wire to this source. The ground wire must connect to the car’s metal frame. This helps prevent electrical issues. Use a fuse to protect the stereo from power surges. Double-check the connections to avoid loose wires.
Hooking Up Speakers And Antenna
Next, connect the speaker wires to the stereo’s output. Match the colors to the right speakers. This ensures sound goes to the correct place. Attach the antenna wire to the stereo’s antenna input. This helps the stereo receive radio signals clearly. Make sure all wires are secure and not pinched.
Integrating The Backup Camera Feed
Find the video input on the stereo for the backup camera. Connect the camera’s video cable to this input. Run the camera’s power wire to the car’s reverse light wire. This powers the camera only when reversing. Test the camera feed on the stereo screen before finalizing the setup.
Testing The System
Testing the system is a vital step after installing your stereo with a backup camera. It ensures everything works smoothly and safely. This phase helps find and fix any problems early. It also lets you adjust settings for the best experience.
Powering On And Initial Checks
Start by turning on your car’s ignition. Watch the stereo and backup camera screens. Check if the stereo powers up correctly. The backup camera should show a clear image.
Listen for sound from the stereo. Confirm there are no strange noises or static. Look for any warning lights on the stereo display. Make sure all buttons respond when pressed.
Check the camera view for brightness and clarity. Ensure the image switches on automatically when the car shifts to reverse. Verify the image is stable without flickering.
Adjusting Camera And Audio Settings
Adjust the camera angle if the view is not centered. Use the monitor’s menu to change brightness, contrast, and color. Set these to get a clear and natural picture.
Test the stereo volume and sound quality. Change bass and treble settings to your liking. Make sure the sound is balanced and clear from all speakers.
Set the backup camera guidelines if available. These lines help judge distance while reversing. Ensure they align correctly with your car’s size and rear view.
Final Assembly And Cleanup
The final assembly and cleanup stage is crucial for a neat and safe installation. This step ensures your stereo and backup camera work well without loose parts or wires. It also protects your car’s interior from damage.
Taking time to secure everything tightly and organize cables makes your setup last longer. A clean finish looks professional and helps avoid future problems.
Securing The Stereo And Camera
First, firmly attach the stereo into the dashboard slot. Use screws or clips as needed to hold it in place. Make sure the stereo does not move or wiggle.
Next, check the backup camera mount. Tighten all screws so the camera stays fixed. Confirm the camera angle is correct for the best view.
Reconnecting The Battery
After securing the devices, reconnect your car battery. Attach the negative and positive terminals tightly. This step restores power to your stereo and camera system.
Turn on the ignition and test both devices. Make sure the stereo powers up and the camera shows the rear view clearly.
Tidying Up Wiring
Organize all cables behind the dash carefully. Use zip ties or clips to bundle wires together. Avoid leaving wires loose or tangled.
Hide cables inside panels or under trim pieces. This prevents damage and keeps the interior looking clean. Double-check that no wires block moving parts or vents.
Troubleshooting Common Issues
Troubleshooting common issues helps keep your stereo and backup camera working well. Problems can happen during or after installation. Understanding simple fixes saves time and stress.
No Power To Stereo Or Camera
Check all power connections first. Loose or disconnected wires cause no power. Use a fuse tester to find blown fuses. Replace any blown fuse with the correct type. Make sure the car battery is charged and working. Test the wiring harness for breaks or damage. Secure all ground wires to a clean metal surface.
Poor Image Quality
Clean the camera lens carefully with a soft cloth. Dirt or water drops blur the picture. Adjust the camera angle to get a better view. Check the video cable for cuts or loose plugs. Use a high-quality video cable to avoid interference. Confirm the stereo screen settings are correct for brightness and contrast.
Audio Problems
Inspect the speaker wires for loose or broken connections. Adjust volume and balance settings on the stereo. Test the stereo with different audio sources to isolate the issue. Replace damaged speakers to restore sound quality. Make sure the stereo’s mute or pause functions are off. Check the audio cables for secure connections.
Frequently Asked Questions
How Do I Connect A Backup Camera To A Car Stereo?
To connect a backup camera, link its video output to the stereo’s video input. Also, connect the camera’s power wires to the reverse light circuit for automatic activation when reversing.
What Tools Are Needed To Install Stereo With Backup Camera?
You need wire strippers, screwdrivers, electrical tape, a multimeter, and mounting brackets. These tools help safely connect wires and securely mount the stereo and camera.
Can I Install A Backup Camera Without Professional Help?
Yes, with basic electrical knowledge and following instructions, you can install it yourself. Just ensure correct wiring and secure mounting to avoid damage or malfunctions.
How Do I Test The Backup Camera After Installation?
Turn on the car and shift into reverse. The stereo display should automatically show the camera feed, confirming proper connection and functionality.
Conclusion
Installing a stereo with a backup camera can improve your driving safety. Following clear steps makes the process easier and less stressful. Double-check all connections to avoid mistakes. Test the system before finishing the installation. Take your time and work carefully for best results.
Enjoy the convenience and added security of your new setup. This upgrade helps you see better while reversing and listen to your favorite music. Simple tools and patience are all you need. Now, you’re ready to drive smarter and safer.