When your car refuses to start, the problem often points to a dead battery. Jump-starting can work in emergencies, but for the long-term health of your battery, using a car battery charger is a safer and better solution. While the process seems simple—connect a few cables and plug in the charger—mistakes here can be dangerous. Doing it right keeps you safe and extends your battery’s life.
Many first-timers worry about sparks, connecting the wrong cable, or damaging the car’s electronics. These are valid concerns. Even experienced drivers sometimes overlook small steps that can make a big difference. This guide will give you clear, step-by-step instructions on how to connect a car battery charger correctly, with practical advice, safety rules, and tips to avoid common mistakes.
You’ll also learn how to choose the right charger and how to handle different battery types.
If you follow these steps, you’ll feel confident every time you need to revive your car battery—without risking yourself or your vehicle.
Understanding Car Battery Chargers
Before connecting anything, it’s important to know what a car battery charger does and the types you might encounter. A battery charger supplies electric current to your battery, restoring its power so you can start your car.
Main Types Of Car Battery Chargers
1. Manual Chargers
These require the user to monitor the charging process. They do not automatically shut off, so you must disconnect them to avoid overcharging.
2. Automatic (smart) Chargers
These chargers sense when the battery is full and shut themselves off or switch to a maintenance mode. This feature prevents overcharging and extends battery life.
3. Trickle Chargers
Trickle chargers deliver a low, steady current. They are ideal for keeping a battery topped up over long periods, such as when storing a car.
4. Jump Starters
While not technically chargers, portable jump starters can deliver a quick power boost to start your car. Some also have charging functions.
How Chargers Differ
Let’s compare the main charger types:
| Type | Automatic Shut-off | Charging Speed | Best For |
|---|---|---|---|
| Manual | No | Fast/Adjustable | Experienced users |
| Automatic (Smart) | Yes | Medium | General use |
| Trickle | Yes | Slow | Long-term storage |
| Jump Starter | N/A | Instant | Emergency starts |
Key insight: Many beginners believe all chargers work the same way. In reality, using a manual charger without supervision can damage your battery by overcharging it. Always read your charger’s manual to understand its features.
Safety First: Preparing To Charge
Working with car batteries is not risk-free. Batteries store a lot of energy and produce hydrogen gas, which can ignite if there’s a spark. Taking precautions is vital for your safety.
Essential Safety Steps
1. Read The Manuals
Before doing anything, read both your car’s owner’s manual and the battery charger’s instructions. Each car model and charger can have different requirements.
2. Work In A Well-ventilated Area
Hydrogen gas from batteries can build up and become dangerous in closed spaces. Always charge outdoors or in a garage with the door open.
3. Wear Eye And Hand Protection
Safety glasses and gloves protect you from acid splashes or sparks.
4. Turn Everything Off
The car’s ignition, lights, and all accessories must be off. Unplug the charger before connecting the clamps to the battery.
5. No Smoking Or Open Flames
Even a small spark can ignite hydrogen gas. Never smoke or use open flames near a battery.
6. Check For Damage
Inspect the battery for cracks, leaks, or corrosion. If you see damage, do not attempt to charge it—replace the battery instead.
Non-obvious insight: Many people forget to remove metal jewelry such as rings or bracelets. Metal can conduct electricity and cause burns or short circuits.
Step-by-step Guide: Connecting A Car Battery Charger
Now you’re ready to connect the charger. The process is not complicated, but following each step in order matters.
1. Identify Battery Terminals
Your battery has two terminals:
- Positive (+): Usually marked with a plus sign and often a red cap or cover.
- Negative (–): Marked with a minus sign and usually black.
Wipe off any dirt or corrosion so you can clearly see the markings.
2. Position The Charger
Set the charger on a stable, dry surface near the battery. Make sure the charger’s cables can reach the battery terminals without stretching.
Pro tip: Never place the charger directly on top of the battery. This prevents accidental contact with battery acid or fumes.
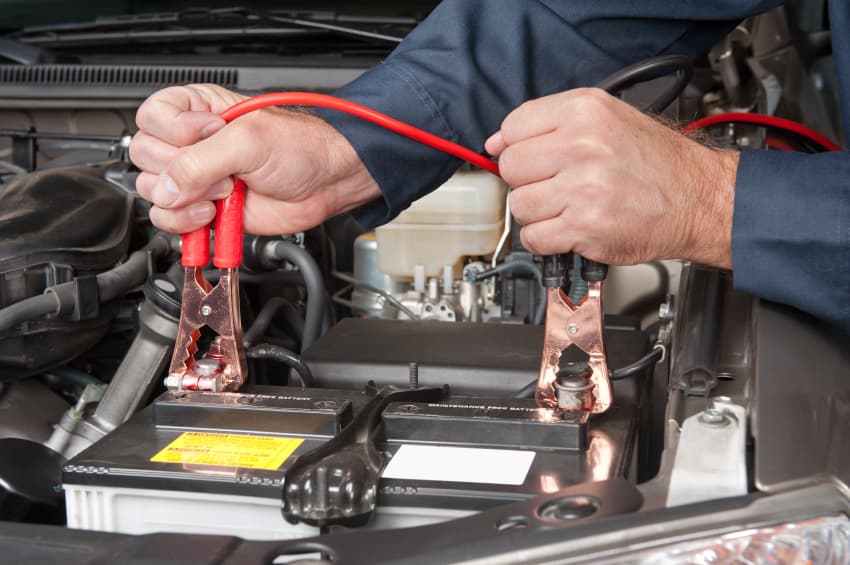
3. Connect The Charger Cables
- Connect the positive (red) charger clamp to the battery’s positive (+) terminal.
- Connect the negative (black) charger clamp to a solid, unpainted metal part of the car’s frame or engine block, not directly to the battery’s negative terminal.
Why not connect directly to the negative terminal? Because batteries can emit hydrogen gas, especially when charging. If there’s a spark, it’s safer away from the battery.
Common mistake: Many people connect the negative clamp to the battery’s negative post, increasing the risk of explosion if a spark occurs.
4. Double-check Connections
Before plugging in the charger, check:
- Clamps are secure and not touching each other.
- Positive is on positive, negative is on a metal ground.
5. Plug In And Set The Charger
Plug the charger into the electrical outlet. Set the charging rate (if your charger allows it). For most cars, a slow charge (2-10 amps) is safest. Fast charging can damage the battery or shorten its life.
Important: If your charger has a timer, set it according to your battery’s needs. If it’s automatic, it will shut off on its own.
6. Monitor The Charging Process
Stay nearby while charging. Check the charger’s indicator lights or display. If you smell rotten eggs (sulfur) or see the battery swelling, stop charging immediately—this can signal a problem.
7. Disconnecting The Charger
When charging is complete:
- Unplug the charger from the wall first.
- Remove the negative (black) clamp from the car’s frame or engine block.
- Remove the positive (red) clamp from the battery.
Remove clamps in the reverse order you attached them. This reduces the risk of sparks.
Quick tip: Don’t forget to replace any protective covers on the battery terminals.
Choosing The Right Battery Charger For Your Car
Not all chargers fit all batteries. Picking the right charger means knowing your battery’s type, size, and what you need from the charger.
Key Factors To Consider
- Battery Voltage
- Most cars use a 12-volt battery. Some trucks, motorcycles, or classic cars may use 6-volt batteries. Always match the charger’s output voltage to your battery.
- Battery Capacity (Amp Hours)
- Check your battery’s Ah rating (amp hours). Choose a charger with an output of about 10% of your battery’s Ah rating for safe, overnight charging.
Example: For a 50Ah battery, a 5-amp charger works well.
- Battery Chemistry
- The most common types are lead-acid, AGM (Absorbent Glass Mat), gel, and lithium. Not all chargers work with all chemistries. Read the charger’s specifications carefully.
- Charger Features
- Automatic shut-off prevents overcharging.
- Multi-stage charging is safer for modern batteries.
- Reverse polarity protection stops damage if cables are connected backward.
- Display or indicator lights help you track progress.
- Charging Speed
- Fast chargers (10-20 amps) are convenient but can damage batteries if overused. Slow chargers (2-5 amps) are gentler and better for battery health.
Comparing Charger Features
Here’s a quick comparison of features to look for:
| Feature | Why It Matters | Ideal For |
|---|---|---|
| Automatic Shut-off | Prevents overcharging | All users |
| Multi-stage Charging | Adjusts current as battery fills | Modern batteries |
| Reverse Polarity Protection | Prevents damage from wrong connections | Beginners |
| Maintenance/Float Mode | Keeps battery full without overcharging | Stored vehicles |
Non-obvious insight: Some chargers claim to “restore” dead batteries. In reality, if a battery is too deeply discharged or old, no charger can bring it back. Always check your battery’s health before buying a new charger.

Charging Different Types Of Batteries
Not all car batteries are the same. Here’s how to handle the most common types:
Lead-acid Batteries
These are the most common and cheapest. They need ventilation during charging, as they produce more gas.
- Use standard or smart chargers.
- Always charge in a ventilated area.
Agm (absorbent Glass Mat) Batteries
AGM batteries are sealed and found in many modern cars.
- Require smart chargers with AGM settings.
- Avoid high-amp manual chargers—they can damage the battery.
Gel Batteries
Gel batteries are rare in cars but common in motorcycles and special vehicles.
- Only use chargers marked as safe for gel batteries.
- Too much voltage can damage gel batteries.
Lithium Batteries
Lithium batteries are lightweight and last long but need special care.
- Use only chargers designed for lithium car batteries.
- Never use a lead-acid charger on a lithium battery—it can cause fire or failure.
Practical tip: When in doubt, look at the battery label or consult your car’s manual.
Charging Process: Step-by-step For Each Battery Type
While the basics are similar, there are a few differences for each battery type.
| Battery Type | Recommended Charger | Key Charging Precaution |
|---|---|---|
| Lead-Acid | Manual or Smart | Well-ventilated area |
| AGM | Smart with AGM mode | No high-amp/manual chargers |
| Gel | Gel-compatible Smart | Low voltage setting |
| Lithium | Lithium-specific charger | Never use lead-acid charger |
Common Mistakes To Avoid
It’s easy to make errors when charging a car battery, especially if you’re in a hurry. Here’s what to watch out for:
1. Connecting Clamps To The Wrong Terminals
This can create sparks, damage electronics, or even blow fuses. Double-check before connecting.
2. Charging A Frozen Battery
Charging a battery that’s frozen can cause it to explode. If your battery is below freezing, move it indoors to thaw first.
3. Overcharging
Leaving a manual charger on too long can cook your battery, leading to swelling and leaks.
4. Using The Wrong Charger Type
AGM, gel, and lithium batteries need special chargers. Using the wrong one can ruin the battery.
5. Charging With Dirty Or Corroded Terminals
Corrosion blocks the flow of electricity. Always clean the terminals before attaching the clamps.
6. Ignoring Warning Signs
Smelling sulfur, seeing smoke, or feeling the battery get hot? Stop charging immediately.
7. Not Securing The Car
Make sure the car is in park (automatic) or neutral (manual), with the parking brake set.
Quick insight: Don’t rely on color alone for identifying terminals. Sometimes battery covers are faded or replaced. Always look for the (+) and (–) symbols.
How Long Should You Charge A Car Battery?
Charging time depends on several factors:
- Charger Output (Amps): Higher amps mean faster charging, but not always better.
- Battery Capacity (Ah): A bigger battery takes longer.
- Battery Charge Level: A fully dead battery takes much more time than a half-charged one.
Example:
If you use a 10-amp charger on a 50Ah battery that is fully dead, it will take about 5 hours (50Ah ÷ 10A = 5 hours). A 2-amp charger would take 25 hours for the same battery.
Tip: Most automatic chargers have indicator lights to show charging progress. If you use a manual charger, check the time often and don’t leave it unattended overnight.
How To Tell When Your Battery Is Fully Charged
Modern chargers make it easy—look for the “fully charged” light or message. With manual chargers, use a voltmeter or multimeter to check.
- A healthy, fully charged 12-volt battery should read about 12.6 to 12.8 volts when resting.
- If the battery holds a charge and starts your car easily, you’re good to go.
Advanced tip: If you charge the battery and it keeps losing power, it may be at the end of its life. Charging won’t fix a battery with a shorted cell.
After Charging: What To Do Next
Once the battery is charged and reconnected, start your car. Listen for any unusual noises and check that all electronics work. If the car still won’t start or the battery dies again soon, the problem could be:
- The battery is too old or damaged.
- There’s a problem with the alternator.
- There’s a “parasitic drain”—something in the car is using power while it’s off.
In these cases, visit a mechanic for further checks.
Key insight: If your battery needs frequent charging, it’s a sign of a deeper issue. Don’t ignore it.

Maintaining Your Battery And Charger
A well-maintained battery lasts longer and gives you fewer problems. Here’s how to keep both in top shape:
- Clean terminals regularly with a wire brush and baking soda solution.
- Check water levels in lead-acid batteries (if not sealed). Add only distilled water.
- Inspect battery case for cracks or leaks.
- Store your charger in a dry, cool place.
- Test your battery twice a year, especially before winter and summer.
Practical tip: If you store your car for months, use a trickle charger or maintenance charger to keep the battery healthy.
Frequently Asked Questions
How Do I Know If My Car Battery Is Charging?
Most modern chargers have indicator lights or a display. When charging, the light may be red or orange. When fully charged, it turns green or shows “FULL. ” You can also check the battery voltage with a voltmeter—12. 6 volts or higher means it’s charged.
Can I Charge A Car Battery Without Disconnecting It From The Car?
Yes, in most cases you can charge the battery while it’s connected. Make sure the car is off and all accessories are switched off. For some sensitive vehicles, check the owner’s manual for advice.
What Happens If I Connect The Charger Cables Backward?
Connecting the positive clamp to the negative terminal (and vice versa) can cause sparks, damage electronics, or blow fuses. Many modern chargers have reverse polarity protection, but always connect cables correctly.
Is It Safe To Leave A Car Battery Charger On Overnight?
If you use a smart or automatic charger with a float/maintenance mode, yes, it’s safe. Manual chargers should not be left unattended overnight, as they can overcharge and damage the battery.
Where Can I Find More Information About Car Battery Maintenance?
For in-depth maintenance tips and troubleshooting, visit the Automotive Battery Wikipedia page for trusted information.
Connecting a car battery charger correctly is simple but important. With the right charger, careful steps, and good habits, you can keep your car ready to go at all times. Battery charging doesn’t have to be risky or confusing. Follow these steps every time, and your car—and wallet—will thank you.