If you want your dash cam to start recording the moment your car powers on, hardwiring it is the best way to go. But maybe you’re unsure where to begin or worried about messing up your vehicle’s wiring.
Don’t worry—this guide will walk you through the steps clearly and simply. By the end, you’ll know exactly how to hardwire your dash cam safely and efficiently, so it stays powered without cluttering your car with messy cables. Ready to take control of your car’s security?
Let’s dive in.
Choosing The Right Dash Cam
Choosing the right dash cam is important before hardwiring it. The correct dash cam fits your needs and works well with your vehicle. Consider key features and power needs to make a smart choice.
Focus on what matters most for safety and convenience. This will save time and avoid issues later.
Features To Consider
Look for video quality that captures clear images day and night. A wide viewing angle helps cover more road area. Some dash cams have GPS to track locations. Motion detection records events even when parked. Loop recording ensures continuous video without gaps. Choose a model with easy controls and a good screen.
Power Requirements
Check the dash cam’s voltage and current needs. Most use 12V or 24V power from the car. Some models have low power modes to save battery. Confirm the power cable type and length fit your vehicle. Ensure the dash cam supports hardwiring to avoid damage. Proper power supply keeps the camera running smoothly all the time.
Gathering Necessary Tools
Before hardwiring your dash cam, gather all necessary tools. Having the right tools makes the job easier and safer. It saves time and avoids mistakes. Prepare everything in one place to stay organized and focused.
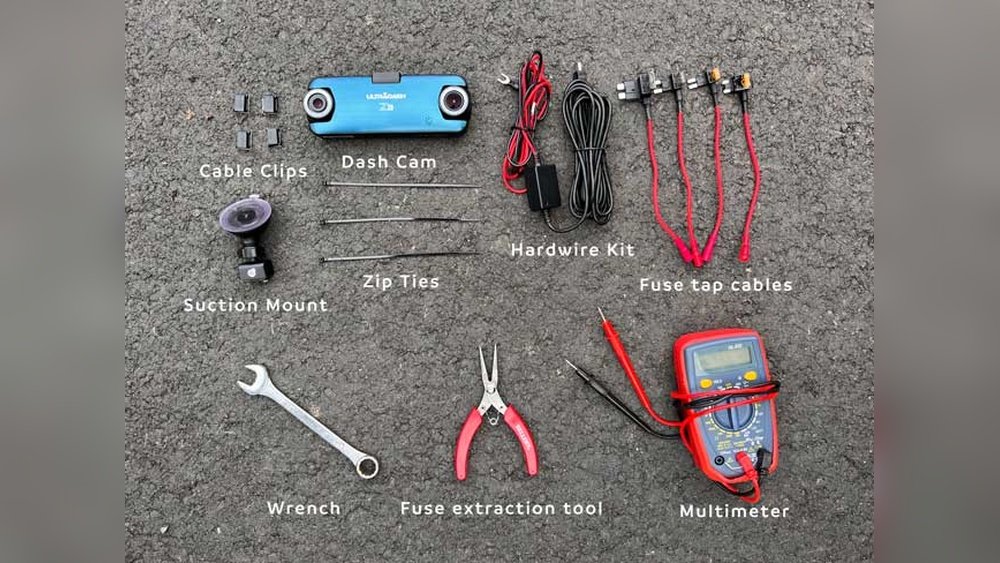
Basic Tools List
Start with basic tools you need for most car wiring tasks. A wire stripper helps remove insulation cleanly. Use a crimping tool to secure wire connectors. A multimeter checks voltage and ensures correct wiring. Electrical tape insulates connections and prevents shorts. A fuse tap kit allows safe connection to your car’s fuse box. Finally, keep a screwdriver set for removing panels and covers.
Safety Equipment
Safety must come first during installation. Wear safety glasses to protect your eyes from sparks or debris. Use gloves to avoid cuts from sharp edges inside the car. Disconnect the car battery before starting any wiring work. This prevents electric shocks and protects your vehicle’s electronics. Keep a fire extinguisher nearby as a precaution. Safety equipment reduces risks and helps you work with confidence.
Preparing Your Vehicle
Preparing your vehicle is the first step to hardwire a dash cam. It ensures a clean and safe installation. You must find the right spots to connect power and ground wires. This step helps avoid damage to your car’s electrical system. Proper preparation saves time and effort during installation.
Locating The Fuse Box
The fuse box holds the car’s electrical fuses. It is usually under the dashboard or hood. Check your car manual to find its exact location. The fuse box cover often has a diagram. This diagram shows the function of each fuse. Identifying the box early makes the next steps easier and safer.
Identifying Power Sources
Choose a fuse that powers the car only when it is on. This prevents battery drain when the car is off. Look for fuses labeled “ACC” or “Ignition.” Use a fuse tester or multimeter to confirm power flow. Find a nearby fuse to keep wiring neat. A good power source ensures your dash cam works correctly without harming the car battery.
Wiring The Dash Cam
Wiring the dash cam is a key step in hardwiring it to your car. This process provides constant power, so the camera records even when the engine is off. It also keeps your car tidy without loose cables.
Two common ways to wire a dash cam are using a hardwire kit and connecting it to the fuse box. Both methods need careful handling but give a clean, permanent power source.
Using A Hardwire Kit
A hardwire kit includes all parts needed to connect the dash cam to your car’s power. It usually has a voltage converter to protect the camera from power spikes.
Start by plugging the kit’s power cable into the dash cam. Then, route the cable along the car’s trim to hide it. Finally, connect the kit to a power source inside your car, like the fuse box.
Hardwire kits often come with detailed instructions. Follow them closely for safety and correct installation.
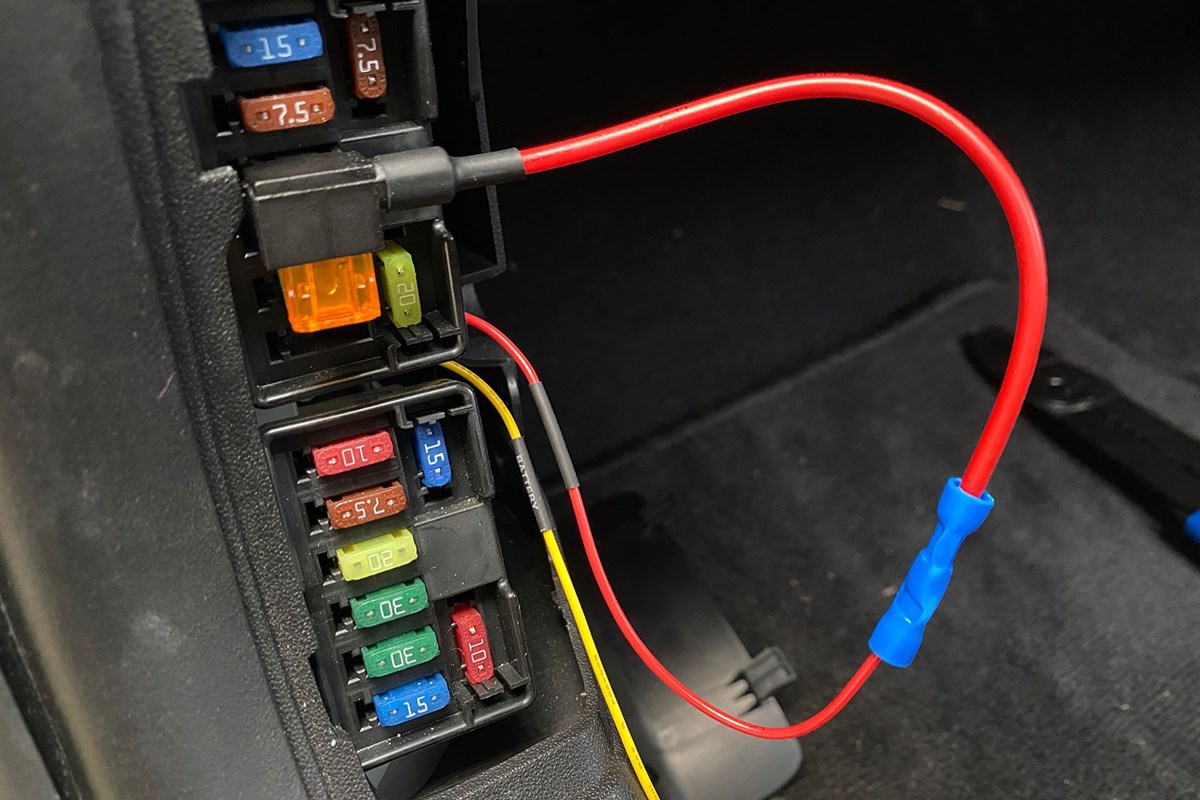
Connecting To The Fuse Box
Connecting the dash cam to the fuse box provides a clean power source. It also allows the camera to turn on and off with the car’s ignition.
First, find a fuse that only works when the car is on. Use a fuse tap to connect the dash cam’s power wire to this fuse.
Attach the ground wire to a metal part of the car’s body. Secure all wires with electrical tape or cable ties. This prevents loose wires and ensures safety.
Test the dash cam to confirm it powers on correctly with the car’s ignition.
Securing The Dash Cam
Securing the dash cam is important for clear video and safety. A well-secured camera stays in place and records steady footage. It also keeps cables neat and avoids distractions while driving. Follow simple steps to mount and manage cables properly.
Mounting The Camera
Choose a spot on the windshield with a clear view. The center behind the rearview mirror works best. Clean the glass surface before attaching the mount. Use the adhesive or suction cup provided. Press firmly and hold for a few seconds. Make sure the camera lens points straight ahead. Avoid blocking the driver’s view or airbags.
Cable Management Tips
Keep cables tidy and out of sight. Run wires along the edges of the windshield and roof. Use clips or cable ties to secure them. Hide cables under the car’s trim or headliner. Avoid loose or hanging wires that can distract. Check that cables do not block controls or airbags. Proper cable management improves safety and appearance.

Testing The Installation
Testing the installation of your hardwired dash cam is crucial. It ensures the device works correctly and records as expected. This step helps avoid problems during driving. Follow the simple tests below to confirm your setup is perfect.
Power Check
First, verify that the dash cam powers on with the car. Turn the ignition key to the accessory position. The dash cam screen should light up immediately. If it stays off, check the fuse and wiring connections. Confirm the hardwire kit is properly connected to the vehicle’s power source. The dash cam must receive constant or switched power depending on your setup.
Recording Verification
Next, confirm the dash cam records video correctly. Check the screen for a recording icon or timer. Drive a short distance and stop. Remove the memory card and play the video on a computer or the dash cam. Look for clear, uninterrupted footage. Ensure the date and time stamp match your settings. This confirms the camera is capturing and saving files properly.
Troubleshooting Common Issues
Hardwiring a dash cam usually works well, but sometimes issues appear. Troubleshooting helps find and fix these problems fast. Knowing common issues saves time and keeps your dash cam running smoothly.
Power Problems
Dash cam may not turn on. Check the fuse to make sure it is not blown. Verify the wiring connections are tight and correct. Use a multimeter to test voltage at the power source. A weak battery can cause power loss. Ensure the hardwire kit matches your car’s voltage.
Recording Failures
Dash cam stops recording or files are missing. Check the memory card for damage or full storage. Format the card inside the dash cam to avoid errors. Update the dash cam’s firmware for better performance. Loose or damaged cables can interrupt recording. Restart the dash cam after any fix attempt.
Frequently Asked Questions
What Tools Are Needed To Hardwire A Dash Cam?
You need a hardwire kit, fuse tap, wire strippers, electrical tape, and a multimeter. These tools ensure a secure and safe installation.
Can I Hardwire A Dash Cam Myself Safely?
Yes, with basic knowledge of car electronics, you can safely hardwire your dash cam. Follow instructions carefully and disconnect the battery first.
Where Do I Connect The Dash Cam Hardwire Kit?
Connect the hardwire kit to a fuse box with constant power and a switched power source for parking mode functionality.
How Long Does It Take To Hardwire A Dash Cam?
Hardwiring a dash cam typically takes 30 to 60 minutes, depending on your car model and experience.
Conclusion
Hardwiring a dash cam keeps it powered without extra cords. It helps record all drives, even when parked. Following safety steps ensures your car’s battery stays safe. Proper installation avoids damage and keeps your dash cam working well. Take your time and double-check connections.
This way, you get steady power and clear video anytime. Enjoy peace of mind knowing your drives are always recorded.