Installing a winch can transform your off-road vehicle, truck, or ATV into a powerful tool for recovery, hauling, and adventure. But before you start pulling heavy loads or rescuing stuck vehicles, you need to know how much time the installation will take. Many people assume it’s a quick bolt-on job, but the reality can be more complex. The time required depends on several factors: your winch type, your vehicle, your experience, and your tools. If you’re planning a DIY install or want to understand what professional installers do, this article breaks down everything you need to know. Let’s explore the details and help you plan your winch installation efficiently.
Understanding Winch Installation
A winch is a mechanical device that uses a drum and cable (or rope) to pull heavy objects. Most commonly, winches are installed on trucks, SUVs, ATVs, and trailers. Installation usually involves mounting the winch, connecting power, and ensuring the system is safe for use.
The time needed for installation depends on:
- The winch model (electric, hydraulic, manual)
- The mounting location (front bumper, rear, trailer bed)
- The vehicle type (frame strength, bumper design)
- Tools available
- Experience level
Most installations take between 2 and 6 hours. However, some can be faster or slower. Let’s break down the process and factors that affect installation time.
Key Factors Affecting Installation Time
Several variables can change how long your winch install takes. Knowing these factors helps you plan and avoid surprises.
1. Winch Type
There are three main types:
- Electric winches: Most common; powered by vehicle battery.
- Hydraulic winches: Use vehicle’s power steering pump; more complex.
- Manual winches: Simple, but rare for vehicle recovery.
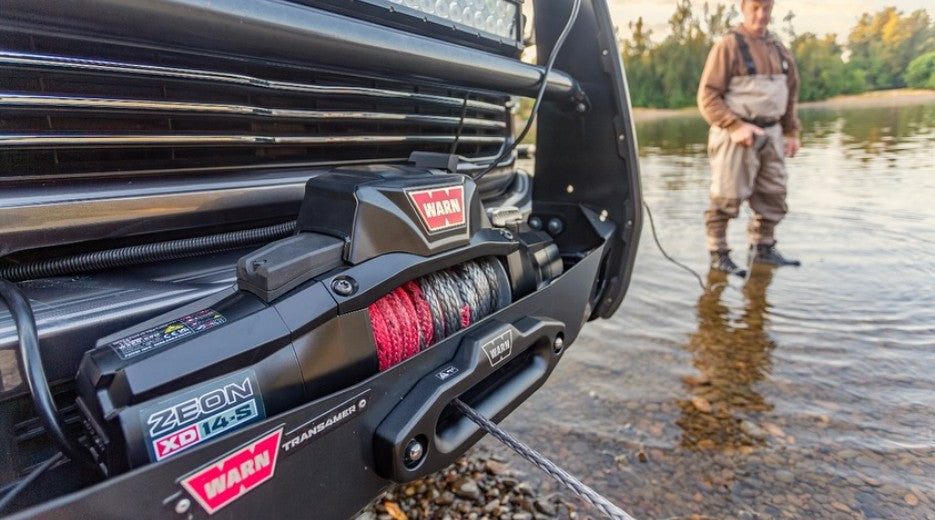
Electric winches are quicker to install, usually requiring less wiring and no fluid connections. Hydraulic winches can take longer due to plumbing.
2. Mounting Location And Hardware
Where you place the winch matters:
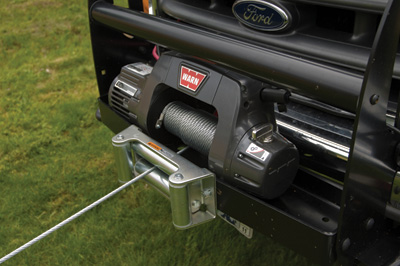
- Front bumper: Most popular; some vehicles need special mounting plates.
- Rear bumper: Similar process, but sometimes harder access.
- Trailer bed: Often easier, but may need custom fabrication.
If your vehicle has a factory winch-ready bumper, installation is faster. Otherwise, you may need to drill holes or install a winch mounting plate, which adds time.
3. Vehicle Compatibility
Each vehicle is unique:
- Jeep Wranglers: Many have aftermarket bumpers designed for winches.
- Full-size trucks: May require frame reinforcement.
- ATVs/UTVs: Smaller, simpler mounts but tight spaces.
Some older vehicles may need custom brackets, which increases installation time.
4. Electrical Wiring
For electric winches, wiring is key. You’ll need to connect:
- Main power cables (from battery)
- Remote control wiring
- Solenoid/relay box
Longer cable runs and complex routing (like through engine bays) add time. If you install extra accessories (like winch isolators or dedicated batteries), installation time grows.
5. Tools And Experience
Having the right tools saves time:
- Socket sets
- Wrenches
- Drill and bits
- Wire strippers/crimpers
Experienced installers can finish faster. If you’re new to winch installation, plan for extra time to read instructions and troubleshoot.
6. Weather And Workspace
Working outdoors in bad weather slows you down. Installing in a garage or shop is faster. Good lighting and a clean workspace help avoid mistakes.
Step-by-step Winch Installation Process
Installing a winch requires careful work. Here’s a detailed breakdown of the steps, including time estimates for each.
Step 1: Preparation (30–60 Minutes)
- Gather tools and parts
- Read winch and vehicle instructions
- Inspect the vehicle bumper/frame
- Lay out hardware and cables
If you need to remove the bumper or old hardware, add extra time (15–30 minutes).
Step 2: Mounting The Winch (45–120 Minutes)
- Position the winch on the mount
- Align bolt holes
- Secure with supplied bolts (torque to specs)
- Install mounting plate if needed
Some vehicles need drilling or cutting. This can add another 30–60 minutes.
Step 3: Wiring The Winch (60–120 Minutes)
- Route main power cables to battery
- Connect cables to winch terminals
- Install relay/solenoid box
- Connect remote control wiring
- Secure cables away from heat and moving parts
If your vehicle’s battery is far from the winch (like rear installs), cable routing takes longer.
Step 4: Testing And Safety Checks (30–45 Minutes)
- Double-check all bolts and connections
- Test winch operation with remote
- Inspect cable/rope for proper winding
- Check for electrical shorts or loose wires
If problems arise (like the winch not powering up), troubleshooting can add more time.
Step 5: Final Assembly And Cleanup (20–40 Minutes)
- Reinstall bumper or trim
- Secure all loose wires
- Clean up workspace
- Store tools
Some installers add a winch cover or safety labels, which takes extra minutes.
Typical Installation Time Table
Let’s compare different scenarios using a data table:
| Installation Type | Experience Level | Estimated Time | Notes |
|---|---|---|---|
| Electric winch, factory-ready bumper | Experienced | 2–3 hours | Minimal wiring, easy mount |
| Electric winch, standard bumper | Beginner | 4–6 hours | Needs mounting plate, more wiring |
| Hydraulic winch install | Experienced | 5–8 hours | Complex plumbing, longer process |
| ATV winch install | Beginner | 2–4 hours | Small spaces, simpler wiring |
Real-world Examples
Let’s look at some practical cases:
Example 1: Jeep Wrangler Electric Winch
A Jeep owner with a winch-ready aftermarket bumper can finish installation in about 2.5 hours. Most time is spent routing cables and testing. No drilling is needed.
Example 2: Ford F-150 Standard Bumper
Installing a winch on a stock F-150 bumper (not winch-ready) takes longer. The installer needs to:
- Remove bumper
- Install a mounting plate (drilling required)
- Route longer power cables
Total time: around 5 hours for an experienced installer. Beginners could need 6–8 hours.
Example 3: Atv Winch
ATVs have less space, but winches are smaller. Owners often finish in 2–3 hours. The most challenging part is routing wires through tight spots.
Comparing Diy Vs Professional Installation
Should you do it yourself or hire a pro? Here’s a comparison table:
| Installation Method | Average Time | Cost | Pros | Cons |
|---|---|---|---|---|
| DIY | 3–6 hours | Low (only parts/tools) | Save money, learn skills | Risk of mistakes, slower |
| Professional | 2–4 hours | $150–$400 (labor) | Fast, reliable, warranty | Higher cost, less personal |
Non-obvious insight: Many people think pros always finish faster, but some shops schedule installs days in advance, and your vehicle might sit for hours before work begins.
Common Mistakes That Increase Installation Time
Avoiding these mistakes can save you hours and frustration:
- Skipping instructions: Always read winch and vehicle manuals. Each model has unique steps.
- Missing hardware: Double-check you have all bolts, plates, and cables before starting.
- Poor cable routing: Don’t rush wiring. Keep cables away from heat and moving parts.
- Improper torque: Loose bolts can cause winch failure. Use a torque wrench.
- Wrong mounting location: Not all bumpers can handle winch loads. Use the correct mounting plate.
- Electrical shorts: Test wiring before final assembly.
- Ignoring safety checks: Never skip testing the winch under light load before using it for heavy recovery.
Another often missed tip: If you install a winch and leave slack in the cable, it can get tangled during first use, causing delays and potential damage.
Practical Tips For Faster, Safer Installation
Experienced installers share these tips:
- Pre-fit everything: Lay out all parts and test-fit before bolting down.
- Label wires: Use tape or markers to remember which wire goes where.
- Use quality tools: Cheap tools slow you down and strip bolts.
- Get help: A second person makes lifting and alignment easier.
- Check YouTube videos: Visual guides can clarify tricky steps.
If you plan to install a synthetic rope winch, remember that the rope is lighter and easier to handle than steel cable, saving time and reducing injury risk.
What To Do If Installation Takes Longer
Sometimes, even with good preparation, things go slow. Here’s what to do:
- Pause and review: If stuck, re-read instructions or search online for solutions.
- Ask for help: Forums and local off-road clubs often help troubleshoot.
- Don’t rush: Mistakes lead to costly repairs. Take breaks if frustrated.
- Check for hidden issues: Rusted bolts, missing parts, or wrong mounts are common.
If you reach 8 hours and still aren’t finished, consider hiring a professional. It’s better to finish safely than rush and damage your vehicle.
Additional Costs And Considerations
Winch installation isn’t just about time. There are extra costs and choices to consider.
Hardware And Accessories
You may need:
- Mounting plates ($50–$200)
- Heavy-duty wiring kits ($30–$100)
- Winch covers ($20–$50)
- Snatch blocks and recovery gear ($30–$100)
Professional Labor
Most shops charge $150–$400 for installation, depending on complexity and location.
Warranty And Insurance
Some winch manufacturers require professional installation for warranty coverage. If you install yourself, check your warranty terms.
Vehicle Modifications
Heavy winches may require suspension upgrades or frame reinforcement. This adds extra installation time and cost.
How Long Does It Take To Install A Winch On Different Vehicles?
Install time varies by vehicle type:
| Vehicle Type | Typical Install Time | Difficulty | Special Notes |
|---|---|---|---|
| Jeep Wrangler | 2–3 hours | Easy–Medium | Many winch-ready bumpers |
| Ford F-150 | 4–6 hours | Medium–Hard | Needs mounting plate, sometimes drilling |
| Chevrolet Silverado | 4–7 hours | Medium–Hard | Heavy-duty frame, complex wiring |
| ATV/UTV | 2–4 hours | Easy–Medium | Tight spaces, simpler wiring |
| Trailer | 1–3 hours | Easy | Often direct mounts, short cable runs |
How To Prepare For A Winch Install
Preparation is critical. Here’s what to do before starting:
- Choose the right winch: Match the winch capacity to your vehicle weight (winch rating should be at least 1.5x your vehicle’s gross weight).
- Check fitment: Make sure your bumper or mounting area can handle the winch.
- Gather tools: Socket set, wrenches, drill, wire strippers, torque wrench.
- Read manuals: Both vehicle and winch instructions.
- Clear workspace: Work in a clean, well-lit area.
- Check electrical system: Ensure your battery is strong enough for winch operation.
Non-obvious insight: If your vehicle’s battery is weak, winch performance suffers. Consider upgrading to a higher-capacity battery before installation.
How To Estimate Your Own Installation Time
To predict how long your winch install will take, answer these questions:
- Is your bumper winch-ready? If yes, subtract 1–2 hours.
- Do you have all tools and parts? If not, add 30–60 minutes for trips to the store.
- Are you experienced with wiring? If yes, subtract 30–60 minutes.
- Are you working alone? If yes, add 30–60 minutes.
- Is your vehicle old or rusty? If yes, add 1–2 hours for hardware removal.
Add up your time estimates for each step. If you’re unsure, plan for the higher number.
Safety Tips For Winch Installation
Safety should always come first:
- Disconnect battery: Before wiring, prevent accidental shorts.
- Wear gloves: Handling steel cable can cause injuries.
- Use eye protection: Drilling and cutting metal creates flying debris.
- Check torque specs: Loose bolts can cause winch failure.
- Test winch with light load: Never use full power until you confirm safe operation.
Winch Installation And Legal Considerations
Some areas have rules about vehicle modifications:
- Bumper laws: Some states require bumpers to meet certain height or strength standards.
- Wiring regulations: Always use proper fuses and follow manufacturer instructions.
- Warranty rules: Some winch warranties require professional installation.
If you’re unsure, check your local DMV or vehicle regulations.
When To Upgrade Your Winch Or Mount
If you use your winch often, you may need to upgrade:
- Heavier winch: If you upgrade your vehicle or add gear, check if your winch is strong enough.
- Better mounting plate: After heavy use, inspect for cracks or wear.
- Improved wiring: High-power winches need thicker cables.
A common mistake is installing a winch on a bumper not designed for recovery loads. Always verify compatibility.
Frequently Asked Questions
How Long Does It Take To Install An Electric Winch?
For most vehicles, an electric winch installation takes 2–6 hours. If your bumper is winch-ready, the process is faster. More wiring or custom mounts add time.
Can I Install A Winch Myself?
Yes, many people install winches themselves. With good tools and instructions, most can finish in 3–6 hours. Beginners should allow extra time for learning and troubleshooting.
Do I Need Special Tools To Install A Winch?
You need basic tools: socket set, wrenches, drill, wire strippers, torque wrench. Some installs need specialty tools like cutting wheels for metal bumpers.
Is Professional Installation Faster?
Usually, yes. Professionals work quickly and avoid mistakes. Most shops finish in 2–4 hours, but scheduling can cause delays. Pros also offer warranty on labor.
What Should I Check After Installing A Winch?
Double-check all bolts and wiring. Test the winch under light load. Inspect cable/rope for tangles. Make sure remote control works. If anything fails, fix it before using the winch for heavy tasks.
Installing a winch is a valuable upgrade for anyone who travels off-road, tows trailers, or works in tough conditions. By understanding the factors that affect installation time, preparing your tools and workspace, and avoiding common mistakes, you can complete the process efficiently and safely. Whether you do it yourself or hire a pro, knowing what to expect helps you plan and avoid surprises. For more technical guidance, visit Offroaders.com Winch Installation Guide. With the right preparation, your winch will be ready for any challenge.