Connecting a winch remote control might seem confusing at first, especially if you’re new to winches or electrical setups. But with the right guidance, anyone can do it safely and effectively. Whether you want to install a wired or wireless remote, understanding the steps, tools, and safety tips is essential.
This guide will walk you through everything you need to know, using simple English and clear examples, so even beginners can follow along confidently.
What Is A Winch Remote Control?
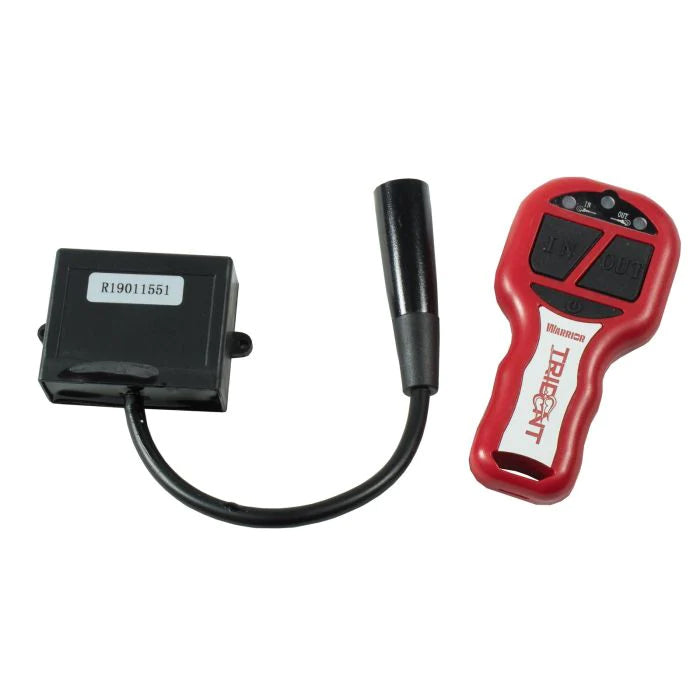
A winch remote control lets you operate your winch from a distance. It’s useful for off-road vehicles, boats, and recovery tasks. Remotes can be wired (using a cable) or wireless (using radio signals). Most winches today support both options, giving you flexibility depending on your needs.
Wired Vs. Wireless Remotes
There are two main types of winch remotes:
- Wired remotes connect directly to the winch using a cable. They offer reliable performance and are less likely to fail due to interference.
- Wireless remotes use radio signals to control the winch. They offer more freedom because you can operate the winch from several meters away.
Here’s a quick comparison between the two:
| Type | Range | Reliability | Installation | Cost |
|---|---|---|---|---|
| Wired | Up to 10 ft | Very high | Simple | Lower |
| Wireless | Up to 100 ft | May have interference | Moderate | Higher |
Most users prefer wireless remotes for convenience, but wired remotes are still popular for their reliability, especially in tough conditions.
Why Connecting A Winch Remote Correctly Matters
Connecting your remote correctly is not just about making the winch work. It’s also about safety and reliability. A bad connection can cause the winch to malfunction, which may damage your equipment or even cause injury.
Statistics show that around 40% of winch failures are due to wiring problems or incorrect installation. Many of these issues could be avoided with proper setup and checks.

Tools And Materials You Need
Before you start, gather the following items:
- Winch remote control (wired or wireless)
- Winch solenoid box (usually comes with the winch)
- Screwdrivers (Phillips and flathead)
- Socket wrench set
- Wire strippers/cutters
- Electrical tape
- Zip ties
- User manual for your winch and remote
For wireless setups, you may also need:
- Receiver box (included with most wireless kits)
- Batteries for the remote
Having the right tools will make the process smoother and reduce mistakes.
Step-by-step Guide: Connecting A Wired Winch Remote
Let’s start with the wired remote, as it’s simpler and common for many winches.
1. Locate The Solenoid Box
The solenoid box is usually mounted near the winch motor. It contains the electrical connectors for the remote and power cables. Look for a plug or socket labeled “Remote” or “Control.”
2. Prepare The Remote Cable
Check the remote cable for any damage. If the cable is old or frayed, replace it before connecting. Most cables have a 3-pin or 5-pin connector. Make sure the connector matches your winch socket.
3. Insert The Connector
Align the connector with the socket on the solenoid box. Gently push it in until it clicks or feels secure. Don’t force it—if it doesn’t fit, double-check the pin alignment.
4. Secure The Cable
Use zip ties to secure the cable along your vehicle’s frame. This prevents the cable from dangling or getting caught during winch operation.
5. Test The Remote
Turn on your winch power. Press the “In” and “Out” buttons on the remote. The winch drum should rotate smoothly in both directions. If it doesn’t, check the connections and try again.
Common Mistakes With Wired Remotes
- Wrong pin alignment: Forcing the connector can bend pins and damage the socket.
- Loose cables: Unsecured cables can snag and unplug during use.
- Using damaged cables: This can cause short circuits and lead to remote failure.
Step-by-step Guide: Connecting A Wireless Winch Remote
Wireless remotes are more convenient but require extra installation steps. Here’s how to connect one safely:
1. Mount The Receiver Box
The receiver box is the heart of your wireless system. Mount it close to the winch motor, usually near the solenoid box. Use screws or zip ties to secure it.
2. Connect Power Wires
Most receiver boxes have red (positive) and black (negative) wires. Connect these to the battery terminals or the winch solenoid’s power posts. Make sure you match colors correctly to avoid electrical issues.
3. Attach Control Wires
The receiver will have control wires (often green, blue, or yellow). Connect these to the corresponding terminals on the solenoid. Check your winch’s manual to match the colors.
4. Insert Batteries Into Remote
Wireless remotes need batteries—usually AA or AAA. Insert fresh batteries, making sure they’re oriented correctly.
5. Pair The Remote And Receiver
Some wireless kits require pairing. Press the pairing button on the receiver box, then hold the remote’s “In” or “Out” button for a few seconds. The LED light should blink to show they’re connected.
6. Test The System
Turn on your winch power. Stand back and press the remote buttons. The winch drum should move as commanded. If it doesn’t respond, check the battery, receiver wiring, and pairing process.
Common Mistakes With Wireless Remotes
- Wrong wire connections: Mixing up power and control wires can damage the receiver.
- Poor mounting: If the receiver box isn’t secure, vibrations may cause wires to disconnect.
- Weak batteries: Always use new batteries for reliable performance.
Compatibility: Not All Winch Remotes Are Equal
Before buying or connecting a remote, check its compatibility with your winch. Here’s a comparison of common winch brands and their remote options:
| Brand | Wired Remote | Wireless Remote | Connector Type | Receiver Needed? |
|---|---|---|---|---|
| Warn | Yes | Yes | 5-pin | Yes |
| Smittybilt | Yes | Yes | 3-pin | Yes |
| Superwinch | Yes | Yes | 3-pin | Yes |
| Badland | Yes | Yes | 3-pin | Yes |
| Mile Marker | Yes | Yes | 5-pin | Yes |
Not all remotes work with every winch. Always check the connector type and whether a receiver box is needed for wireless operation.

Practical Tips For A Reliable Connection
Secure All Connections
Loose connectors are a common cause of remote failure. After connecting, gently tug each wire and plug to make sure it’s firmly attached.
Keep Connections Dry
Moisture can cause corrosion and short circuits. If your winch is exposed to rain or mud, wrap connections with electrical tape or use waterproof covers.
Test Before Every Use
Before you use your winch in the field, always test the remote. This simple step prevents surprises when you’re stuck or need recovery.
Carry A Backup Remote
If you often work in tough conditions, keep a spare remote (wired or wireless) in your vehicle. Many winch owners overlook this, but it can save your day.
Update Firmware (for Advanced Systems)
Some modern wireless remotes allow firmware updates for better performance. Check your winch’s manual or the manufacturer’s website for updates.
Troubleshooting: If Your Remote Doesn’t Work
It’s frustrating when your winch remote fails, especially during a recovery operation. Here’s how to diagnose common problems:
Wired Remote Issues
- No response: Check if the cable is plugged in securely. Inspect for broken wires.
- Intermittent operation: Loose connectors or corroded pins are likely. Clean pins and reconnect.
- Winch moves only one way: Possible wiring fault. Check if one control wire is loose or damaged.
Wireless Remote Issues
- No signal: Try new batteries. Make sure the receiver box is powered.
- Remote pairs but doesn’t operate: Wrong wiring on receiver. Double-check connections.
- Short range: Metal objects or interference may block the signal. Move to a clearer area.
When To Seek Professional Help
If you’ve checked all connections and the remote still fails, consult a professional installer or your winch’s customer support. They can help diagnose deeper issues like solenoid failure or internal wiring problems.
Safety Precautions You Should Never Skip
Connecting a winch remote is not dangerous if you follow basic safety rules. Here are tips to keep you safe:
- Disconnect battery power before wiring. This prevents accidental activation.
- Wear gloves to protect your hands from sharp wires or connectors.
- Keep bystanders away during testing. Winches are powerful and can cause injury if misused.
- Don’t operate the winch solo in risky situations. Always have someone nearby for help.
Real-world Examples And Data
In a survey of off-road users in the US, over 68% preferred wireless winch remotes for convenience, but 22% reported signal issues in tough environments like forests or near metal structures. Wired remotes rarely failed, but some users found cables annoying during use.
Another report from the International Winch Association showed that 38% of remote failures were caused by improper installation, not hardware defects. This highlights the importance of following each step carefully.
Advanced Installation: Dual Remote Setup
Some users want both wired and wireless control for backup or flexibility. Many modern winches support dual setups. Here’s how to connect both:
1. Install Wired Remote As Usual
Follow the steps for connecting the wired remote. Secure the cable and test operation.
2. Add Wireless Receiver
Mount the receiver box and connect its wires, as described earlier. Make sure you don’t disconnect the wired remote’s socket.
3. Test Both Remotes
Turn on the winch power. Test both remotes separately. Both should work, but never use them at the same time—this can confuse the winch’s control system.
Dual Setup: Pros And Cons
| Feature | Dual Setup | Single Remote |
|---|---|---|
| Backup control | Yes | No |
| Convenience | High | Medium |
| Installation | Moderate | Easy |
| Cost | Higher | Lower |
Dual setups are popular for professionals and frequent off-roaders who value reliability.
Maintenance Tips For Long-term Performance
To keep your winch remote working for years, follow these maintenance steps:
- Inspect cables and connectors monthly for damage or corrosion.
- Clean contacts with electrical cleaner spray to prevent buildup.
- Store remotes in a dry, cool place when not in use.
- Replace batteries in wireless remotes every 6 months, even if not empty.
- Update firmware (if supported) yearly for best performance.
Most remote problems can be avoided with simple checks and care.
Upgrading Your Winch Remote: What To Consider
If you want to upgrade to a better remote, consider these points:
- Compatibility: Check connector type and receiver requirements.
- Range: Wireless remotes offer more freedom, but check for interference issues.
- Durability: Waterproof and shockproof models last longer.
- Ease of use: Look for remotes with big buttons and clear labels.
Avoid buying cheap remotes from unknown brands—they often fail after a few months.
Environmental Impact And Sustainability
Winch remotes and receivers use plastic, metal, and batteries. To reduce waste:
- Recycle old remotes and batteries at certified e-waste centers.
- Choose remotes with rechargeable batteries if possible.
- Buy quality products that last longer, reducing the need for replacements.
Manufacturers like Warn and Smittybilt now offer eco-friendly packaging and support recycling. For more on sustainable practices, visit the Environmental Protection Agency.
Frequently Asked Questions
What’s The Main Difference Between Wired And Wireless Winch Remotes?
Wired remotes use a cable for direct connection. They’re reliable and less likely to fail due to radio interference. Wireless remotes use radio signals, letting you operate the winch from farther away. Wireless models are more convenient but may have signal problems in tough environments.
Can I Use Both Wired And Wireless Remotes At The Same Time?
Most modern winches allow you to connect both, but you should use only one remote at a time. Using both together can confuse the winch’s control system and lead to unexpected operation.
How Far Can I Operate A Wireless Winch Remote?
Most wireless remotes work up to 100 feet (about 30 meters), but range depends on obstacles and battery strength. Metal objects and thick walls can reduce range.
What Should I Do If My Winch Remote Stops Working Suddenly?
First, check connections and batteries (for wireless remotes). Inspect cables for damage. If problems continue, test with a backup remote or seek professional help. Many issues are caused by loose wires or dead batteries.
Are Winch Remotes Waterproof?
Most remotes are water-resistant, not fully waterproof. Check your model’s rating. For heavy rain or mud, use waterproof covers or store remotes in a dry place when not in use.
Connecting your winch remote control is simple once you know the steps. Always follow safety rules, use the right tools, and check compatibility. With proper installation and regular maintenance, your winch will work reliably whenever you need it. Whether you choose wired or wireless, understanding the details ensures you can operate your winch with confidence and safety.