Wiring a winch to a battery might seem intimidating, especially if you are new to vehicle upgrades or off-road equipment. But learning this skill can save you from trouble during an outdoor adventure or help you recover your vehicle from tough situations.
Winches are powerful tools that rely on a strong, reliable electrical connection. If installed incorrectly, you risk damaging your winch, battery, or even your vehicle. This guide aims to make the process clear and safe, using simple steps, practical advice, and expert tips.
Whether you have an ATV, a truck, or a Jeep, you’ll learn how to wire your winch confidently and avoid common mistakes.
Understanding The Basics: Winch And Battery Connection
Before starting, it’s important to understand how a winch works and why wiring it correctly to your battery matters. A winch uses an electric motor powered by your vehicle’s battery. The motor pulls a cable or rope, which helps recover vehicles or move heavy objects. Because winches require a lot of power, the wiring must handle high electrical loads.
Most winches use either a 12-volt or 24-volt battery system. For passenger vehicles and ATVs, 12-volt batteries are standard. The winch has two main power cables—positive (red) and negative (black)—that connect directly to the battery terminals. Some winch kits also include a solenoid or relay, which acts as a switch between your winch and the battery.
Incorrect wiring can lead to problems such as:
- Overheating cables
- Battery drainage
- Electrical shorts
- Reduced winch performance
Understanding these basics helps you appreciate why following the right steps is important. Now, let’s look at what you need before starting.
Essential Tools And Materials
Getting the right tools and materials before wiring your winch saves time and avoids mistakes. Here’s what you’ll need:
- Winch kit: Includes winch, cables, remote control, mounting hardware
- Vehicle battery: 12-volt or 24-volt, depending on your winch
- Wiring kit: Power cables, connectors, solenoid/relay, fuses
- Socket set: For tightening nuts and bolts
- Wire cutters and crimpers: For preparing cables
- Electrical tape or heat shrink tubing: For insulation
- Wrench or spanner: For battery terminal nuts
- Multimeter: To check voltage and connections
- Safety gloves and goggles: Protects you from sparks and injuries
- Zip ties: For organizing cables
Most winch kits include basic cables and hardware, but sometimes you need longer wires or extra connectors. Always check your vehicle’s battery size and winch requirements before buying.
Step-by-step Guide: Wiring A Winch To A Battery
Wiring a winch is a process that requires attention to detail. Follow these steps to ensure a safe and effective installation.
Step 1: Safety First
Before starting, make sure your vehicle is parked on a flat surface with the engine off. Wear safety gloves and goggles to protect against sparks or battery acid. Disconnect the negative terminal of your battery to prevent accidental short circuits.
Step 2: Mount The Winch
Mount the winch securely to your vehicle’s bumper, winch plate, or designated frame area. Use the hardware provided in your winch kit. Tighten all bolts firmly, as loose mounting can cause the winch to shift or break under load.
Step 3: Connect The Solenoid/relay
Most winches use a solenoid or relay to control power flow. Mount the solenoid near the winch or battery, away from heat and moving parts. The solenoid has terminals marked for:
- Battery (+): Positive cable from battery
- Winch (+): Positive cable to winch
- Ground (-): Negative cable
Follow your winch’s wiring diagram carefully, as some models have different layouts.
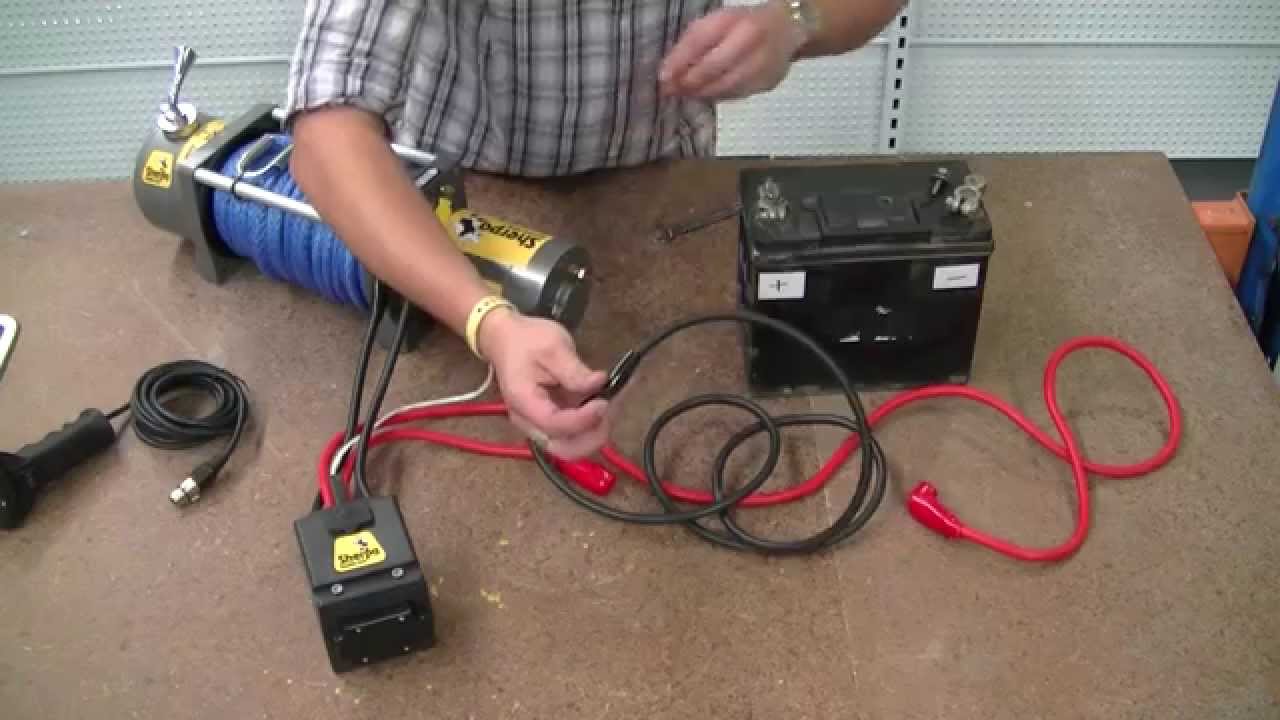
Step 4: Attach The Power Cables
Connect the thick red cable from the solenoid’s battery terminal to the battery’s positive terminal. Connect the black cable from the winch’s ground terminal to the battery’s negative terminal.
If your winch has a remote control, connect its wires to the solenoid as described in the manual. Secure all connections using crimp connectors or bolts.
Step 5: Use Fuses And Circuit Breakers
Install a fuse or circuit breaker on the positive power cable, close to the battery. This protects your winch and vehicle in case of overload or short circuit. Most winches recommend a 50–150 amp fuse depending on capacity.
Step 6: Insulate And Secure Cables
Wrap exposed connections with electrical tape or heat shrink tubing. Use zip ties to bundle cables and keep them away from moving parts or sharp edges. This prevents wear and accidental disconnections.
Step 7: Test The Installation
Reconnect the battery’s negative terminal. Use a multimeter to check voltage at the winch terminals. Activate the winch using the remote or switch. Listen for smooth operation and check for any unusual sounds or overheating. If the winch runs slowly or doesn’t move, check your connections.
Step 8: Final Inspection
Double-check all bolts, cable routing, and insulation. Make sure no wires are loose, and all terminals are tight. If you notice sparks, heat, or strange smells, stop and review your wiring.
Common Wiring Configurations Explained
Winch wiring can vary depending on your vehicle and winch model. Here are the three most common setups:
Direct To Battery Wiring
This is the simplest method, usually for ATVs and small winches. Power cables go straight from the winch to the battery terminals. It’s quick but less protected against overloads.
Solenoid/relay Wiring
Most modern winches use a solenoid for safety. The solenoid acts as an electrical switch, only sending power when you activate the winch. This setup protects your battery and winch motor.
Remote Control Wiring
Some winches have wireless or wired remotes. Their wiring includes extra cables from the solenoid to a control box or receiver. Make sure these are connected according to your winch’s diagram.
Below is a comparison of wiring configurations for clarity:
| Configuration | Safety Level | Complexity | Suitable For |
|---|---|---|---|
| Direct to Battery | Low | Easy | ATVs, small winches |
| Solenoid/Relay | High | Moderate | Trucks, large winches |
| Remote Control | Medium | Advanced | Off-road vehicles, wireless setups |
Choosing The Right Cable Size
Cable size matters for winch performance. Too thin cables cause overheating and reduce power. Use cables rated for your winch’s amperage.
Typical cable sizes:
- 8 AWG: Up to 60 amps (small winches)
- 6 AWG: Up to 75 amps
- 4 AWG: Up to 100 amps
- 2 AWG: 100+ amps (large winches)
Measure the distance from battery to winch. Longer runs need thicker cables. Here’s a quick reference:
| Cable Size | Max Amps | Max Distance (Feet) | Winch Size |
|---|---|---|---|
| 8 AWG | 60 | 6 | Small ATV winch |
| 4 AWG | 100 | 10 | Medium truck winch |
| 2 AWG | 150 | 15 | Heavy-duty winch |
Always use cables with proper insulation and quality connectors. A bad cable can cause power loss and even fires.
Practical Tips For Safe And Reliable Wiring
Many beginners miss small details that can make a big difference. Here are some practical tips:
- Avoid running cables near hot engine parts. Heat can melt insulation and cause shorts.
- Use waterproof connectors if your winch will face water or mud.
- Label your cables for easy troubleshooting.
- Check battery voltage before and after installation. A weak battery can’t power a winch effectively.
- Don’t use household wire—always use automotive-grade cables.
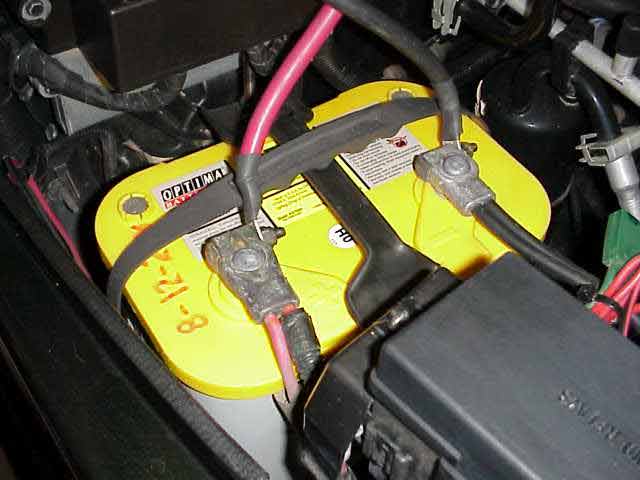
One mistake beginners often make is forgetting to check for corrosion at battery terminals. Corrosion reduces conductivity and can cause the winch to fail under heavy loads. Clean terminals with a wire brush before installation.
Another overlooked detail is cable routing. Sharp bends or pinched cables can lead to breaks. Route cables smoothly, and avoid tight spots.
Example: Wiring A Winch On A Jeep Wrangler
Let’s walk through an example using a Jeep Wrangler and a 12,000 lb winch.
- Mount the winch to the front bumper using the supplied plate and bolts.
- Install the solenoid near the battery, away from heat and moving parts.
- Connect the thick red cable from the solenoid to the battery’s positive terminal.
- Connect the black cable from the winch to the battery’s negative terminal.
- Install a 150 amp fuse on the positive cable, close to the battery.
- Attach the remote control wires to the solenoid.
- Insulate all connections and secure cables with zip ties.
- Test the winch by pulling a light load. Listen for smooth operation.
If you notice the winch slowing down or stopping, check the battery voltage. Jeep Wranglers often have multiple accessories, and a weak battery can’t support heavy winch use.
Comparing Winch Battery Wiring: Permanent Vs Temporary
You can wire your winch permanently or temporarily. Each method has pros and cons.
| Method | Advantages | Drawbacks | Best For |
|---|---|---|---|
| Permanent | Always ready, safer, clean look | Higher cost, more work | Daily use, off-road vehicles |
| Temporary | Easy setup, quick removal | Less safe, messy cables | Occasional use, trailers |
Permanent wiring is best for frequent winch users. Temporary setups work for occasional recovery or moving equipment.
Troubleshooting Winch Wiring Problems
Even with careful installation, problems can happen. Here are some common issues and solutions:
Winch Doesn’t Operate
- Check battery voltage: If below 12 volts, recharge.
- Check cable connections: Loose terminals can break power flow.
- Check fuse: Replace if blown.
- Check remote control: Dead batteries or loose wires can cause issues.
Winch Runs Slowly
- Check cable size: Thin cables restrict power.
- Check battery health: Old batteries can’t deliver enough current.
- Inspect for corrosion: Clean terminals if needed.
Sparks Or Burning Smell
- Disconnect immediately: This can be a sign of a short or overload.
- Check for damaged insulation: Replace cables if melted or frayed.
- Check fuse rating: Too small fuses can blow; too large can risk fire.
Winch Only Works One Way
- Check solenoid wiring: Some winches need special wiring for reverse.
- Check remote control: Buttons can stick or fail.
How Battery Quality Impacts Winch Performance
Your winch’s performance depends on battery quality. Winches require high current, sometimes up to 150 amps for heavy-duty models. If your battery is weak, the winch will run slowly or fail.
Signs of a weak battery:
- Dim headlights when winch operates
- Slow winch speed
- Frequent fuse blowing
Using a deep-cycle or high-output battery improves winch performance. These batteries are designed for high-load accessories.
Safety Tips For Winch Wiring And Operation
Safety is always a priority with winch wiring. Here are important tips:
- Disconnect battery before starting installation.
- Never touch both terminals with metal tools.
- Keep cables away from sharp edges and moving parts.
- Install fuse or circuit breaker to prevent overloads.
- Check wiring after off-road trips—mud and water can loosen connectors.
- Never operate winch with damaged cables.
If you’re unsure, consult a professional or refer to official manuals, like those found at Wikipedia.
Upgrading Your Winch Wiring: When And Why
Sometimes, you need to upgrade your winch wiring. Reasons include:
- Installing a larger winch
- Adding extra battery accessories
- Lengthening cable runs
Upgrades involve thicker cables, better connectors, and higher-rated fuses. If your winch draws more than 100 amps, upgrade to 2 AWG cables and a 150 amp fuse. Always check your battery’s output and alternator capacity.
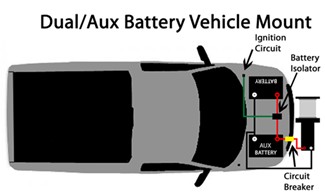
Winch Wiring For Multiple Batteries
Some vehicles use dual batteries for winch operation. Dual battery setups provide more power and reduce strain on the main battery.
How it works:
- One battery powers the winch, the other powers vehicle electronics.
- Batteries are connected with a battery isolator to prevent draining both at once.
Dual battery setups are common in off-road trucks and expedition vehicles. If you plan long winch sessions, consider this upgrade.
Frequently Asked Questions
How Long Does It Take To Wire A Winch To A Battery?
For most vehicles, wiring a winch takes about 1–2 hours. If you have experience with electrical work, it can be faster. Beginners should allow extra time for careful installation and troubleshooting.
What Happens If I Use The Wrong Cable Size?
Using cables that are too thin can cause overheating, reduce winch power, and may even lead to electrical fires. Always match cable size to your winch’s amperage and distance from the battery.
Can I Use A Winch With A Weak Battery?
A weak battery can make the winch run slowly or fail to operate. For best performance, use a fully charged, high-output battery. Consider upgrading to a deep-cycle battery if you use the winch often.
Do I Need A Fuse Or Circuit Breaker?
Yes, a fuse or circuit breaker is essential for safety. It prevents overloads and protects your winch and vehicle from electrical damage. Install it on the positive cable, close to the battery.
Can I Wire A Winch To A Trailer Battery?
Yes, you can wire a winch to a trailer battery. Make sure the battery is rated for the winch’s amperage and install the correct fuse. Use thick cables and secure connections to handle heavy loads.
Wiring a winch to a battery is a skill that gives you confidence in outdoor situations and ensures your equipment works safely. By following the steps and tips above, you can wire your winch correctly, avoid common mistakes, and enjoy reliable performance when you need it most.
Remember to check your wiring regularly, upgrade when necessary, and always put safety first.